WooCommerce Discounts & Deals: The Ultimate Guide To Best Discounting Practices

Today you’re going to learn everything about WooCommerce discounts and advanced discounts.
This guide looks at different ways you can make your discounts and deals irresistible. The best part?
All these discounting tactics are backed by real world case studies and examples of successful store owners.
In fact, we’ve looked at 1000s of stores to collate the best 9 untapped discounting tactics that convert.
Note: Throughout this article, I will be using one tool i.e. Finale to set up WooCommerce Discounts. It’s a powerhouse tool for setting up the urgency and scarcity-inducing promotional campaigns.
By the end of this post, you’ll know:
How to create cash-pumping campaigns that convert and build a fail-proof discounting strategy for your store.
So fasten your seat belts and let’s hit the tarmac.
Contents
- Tactic#1: Create Time-Bound WooCommerce Discounts i.e. Flash Sales
- Tactic#2: Set up ‘Deal of the Day’ Promotions to Trigger Impulse Buying
- Tactic#3: Set Up WooCommerce Discount Coupons with a Deadline & Highlight It
- Tactic#4: Set up Festive Time Free Shipping Offers to Get a Bigger Pie of Shoppers’ Budget
- Tactic#5: Woo Shoppers with Product Page Discounts on Hand-Picked Products
- Tactic#6: Use Early Bird Discounts to Get Your Initial Sales
- Tactic#7: Put a Limit on the Number of People That Can Grab the Deal
- Tactic#8: Offer Special Discount to Hand-Raisers During Pre-Launch Campaign
- Tactic#9: Embed Countdown Timer in Emails to Increase Click Through
- What’s next?
Tactic#1: Create Time-Bound WooCommerce Discounts i.e. Flash Sales
Have you seen people rushing on their way to the airports? Maybe like me you too have had hush-hush trips to the airport! We do this because there’s a deadline attached to this task. If we don’t make it on time, we’ll miss the flight.
Flash sales have a similar impact on people’s mind because if shoppers don’t buy in the given time frame, they miss out on the savings.
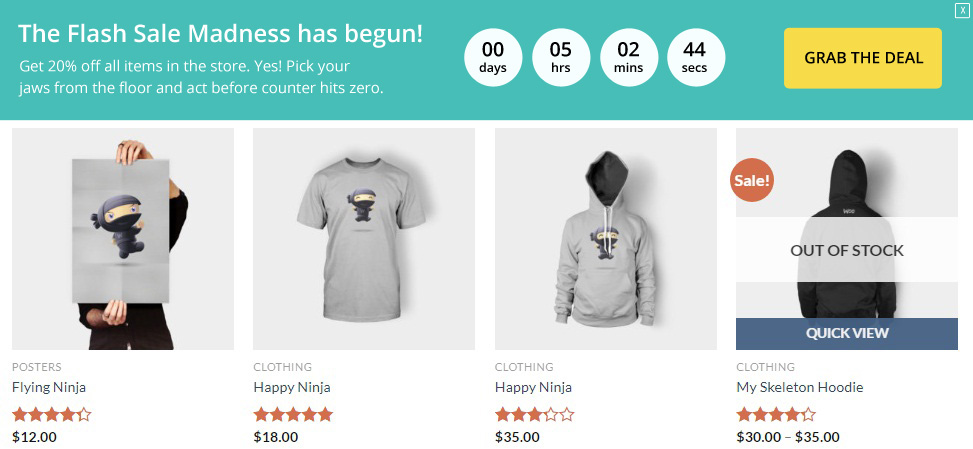
Flash sales are short duration sales between two fixed dates and time. Use them to move inventory, increase sales and lift your bottom line. The Musician’s Guide increased their sale by 332% with a flash sale limited to 100 hours. The sales countdown timer informed people about the time left for the campaign to end.
Take a look at how Asos runs its flash sales:
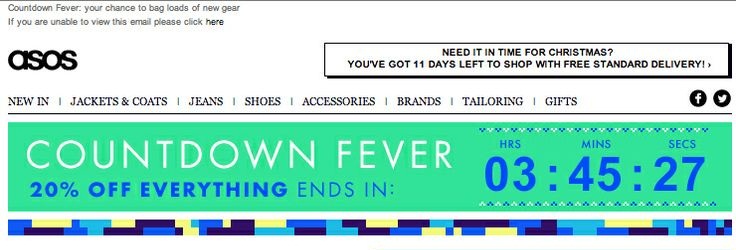
There’s a clear deadline to the campaign and the header informs visitors about the offer.
You too can set up a flash sale with a prominent sticky header, highlighting the sale details in your WooCommerce store.
Here’s a sticky header highlighting the WooCommerce discount details:
WooCommerce Discount for a set duration i.e. Flash Sale setup
Currently, to set up a Flash Sale in WooCommerce, you’ll have to visit individual product pages and set up scheduled sales on each product.
How to Set up a Flash Sale in WooCommerce using Finale
But with Finale, you can set up one time or recurring storewide scheduled sales without visiting each WooCommerce product page.
Step #1: Choose ‘One Time’ from the Schedule tab to set up the campaign between two fixed dates and time.
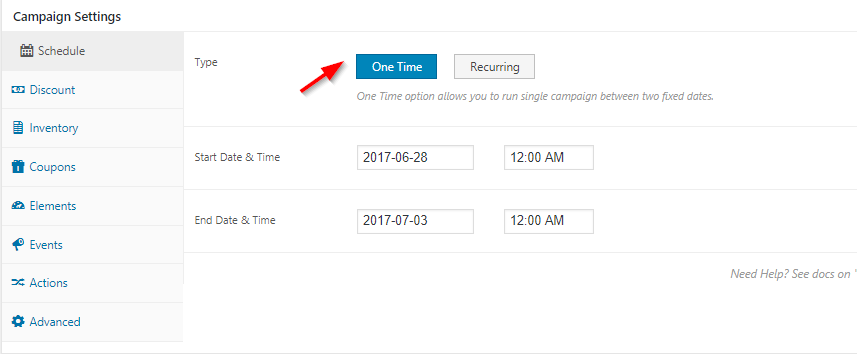
Setting up one-time sale between two fixed dates and time
Step #2: Set the discount amount based on an item’s regular price from a single page
To set up different discounts on different products, select ‘Advanced’ tab. You can set up discounts like this:
If the product price is between $50 and $100, set the discount at, say 10%.
And if the product price is between say $100 and $200, assign the discount amount to say, 15%. Here’s how:
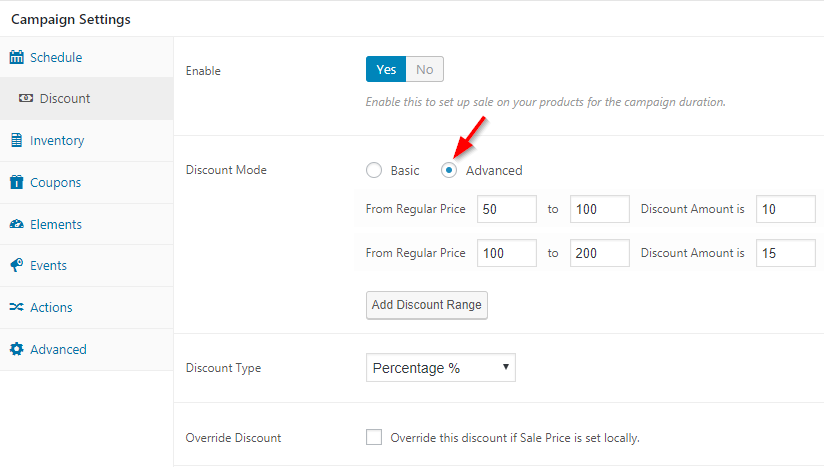
Tiered WooCommerce discount with Finale
Select Percentage from the drop down to assign all the discounts in percentage. Powerful? You bet.
Further, set up the sticky header to announce the flash sale to visitors. No matter where a visitor is on your site- home page, category page, blog post, product page, about page – it keeps reminding them.
I’ll show you how to set up the sticky header in the next section.
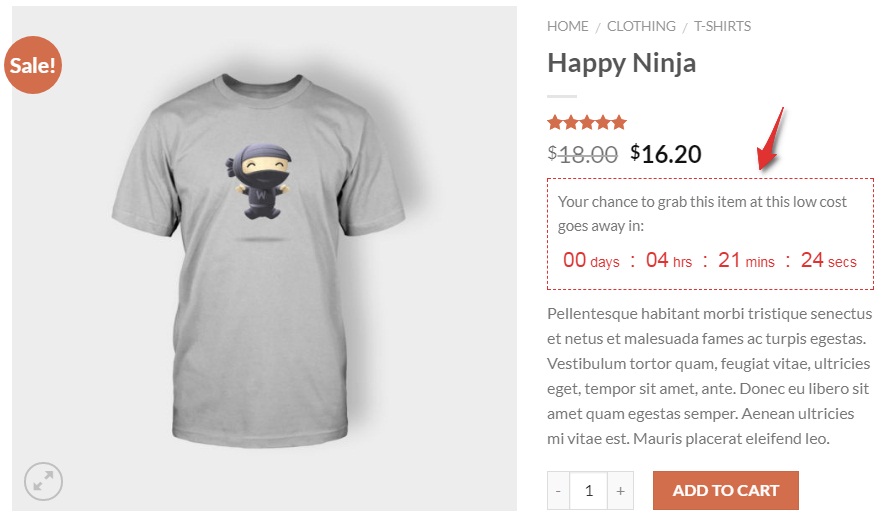
Tactic#2: Set up ‘Deal of the Day’ Promotions to Trigger Impulse Buying
Setting up WooCommerce discount for a day can trigger an urgency to buy.
Deal of the day campaign spotlights a product with a limited-time offer. This makes the process of choosing easy.
One doesn’t have to go through the entire catalogue, battle confusion and anxiety to find the right option. Instead, they can take the buying decision much faster.
Watch this video to learn how to schedule a sale in WooCommerce with Finale:
Notice how QVC highlights Today’s Special with a ticking countdown timer:
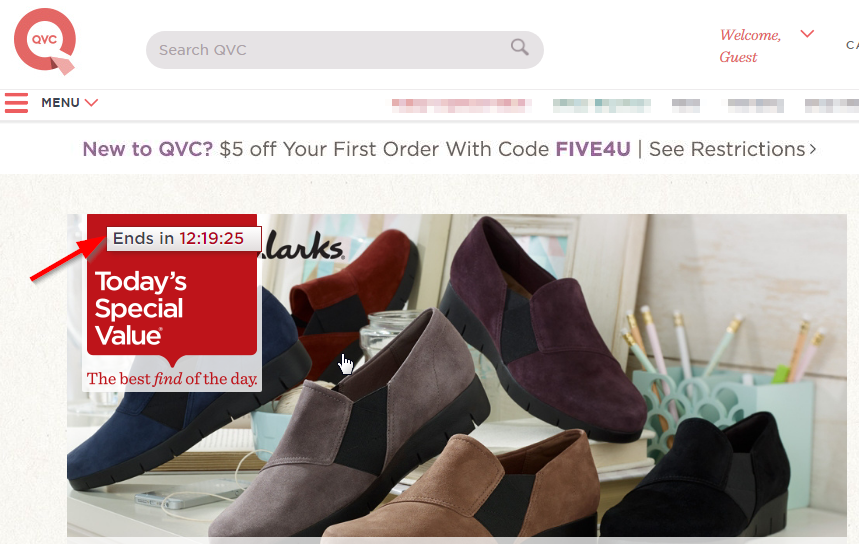
Deal of the Day campaign in QVC.com
When you click on it, it leads you to a single product page. Not a category page with a sea of options to choose from.
Deal of the day can lead to impulse buying, and thus you too must not miss this opportunity bus! Set this up on your WooCommerce store using Finale.
WooCommerce Discount for 24 Hours: Deal of the Day Campaign
Deal of the Day promotion in WooCommerce
The call to action button directs them to the specific product page with the offer.
How to Set Up WooCommerce Deal of the Day Campaign
Step #1: The first step is to schedule your campaign and set the dates/time
Step #2: Set basic discount of say, 20% and from the drop down select percentage
You have two option in discount – choose percentage discount or fixed amount discount.

Setting up percentage discount in WooCommerce
Step #3: Go to Rule Builder and enter the products on which you want to run the campaign
Selecting specific products to offer discounts on
Step #4: Set up the sticky header and configure the display options:

Configuring sticky header to display on the store
Once you have set the parameters, update it. The campaign will go live and the associated sticky header will also start showing up on your store.
Alternatively: You can set up the campaign on the product detail page itself.
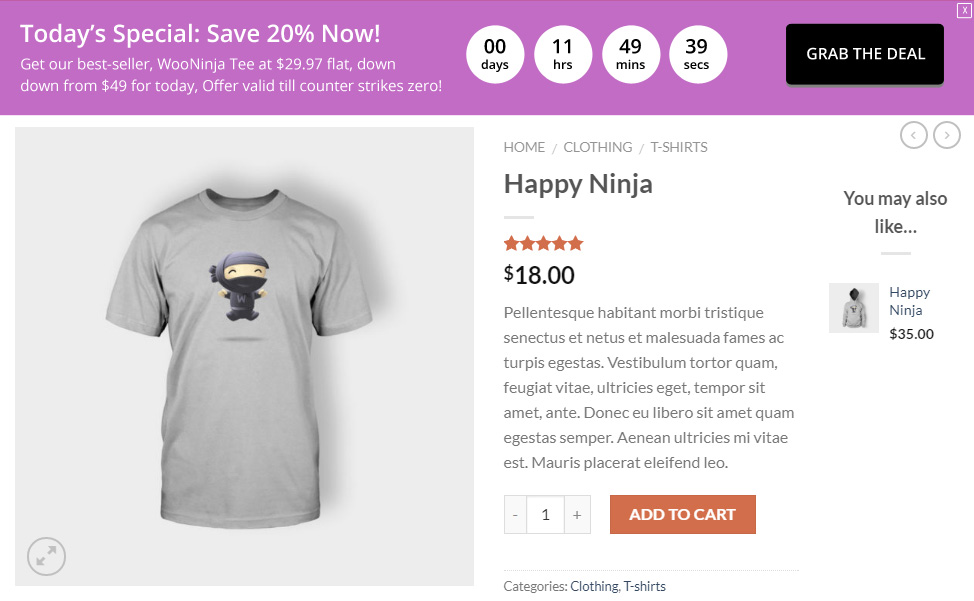
Take a look at how MakersKit highlights the time-limit on the discount:
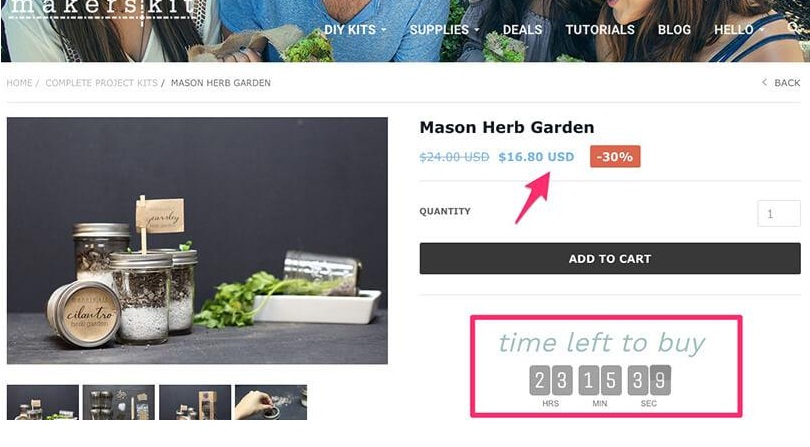
Here’s how you can highlight the deal of the day on your WooCommerce product page:
Today’s Special promotion on WooCommerce product page
Notice the message on the product page highlights the potential loss of shoppers. It lets them know that passing up on this opportunity comes with a cost.
Click here to learn more about how to schedule sales and click here to learn more about setting up bulk discounts in WooCommerce with Finale.
Tactic#3: Set Up WooCommerce Discount Coupons with a Deadline & Highlight It
27% of abandoned carts are due to customers searching for a coupon code. – PayPal
The biggest reason why people don’t redeem coupons, and the uptakes remain low is that they never find out about it!
What’s the fun if they have to hunt for coupon codes everywhere? The best way to ensure your visitors redeem the coupon is to make it unmissable.
When they know they have the key to unlock instant savings, they’ll most likely to use it!
Coupons help boost customer loyalty, so make sure you offer them and highlight them well too!
Notice how PetMeds highlights the coupon details- the code, discount, expiry details on the sticky header:
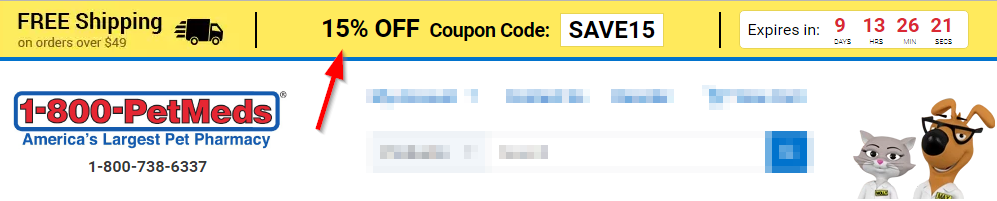
The accompanying countdown timer informs people about the coupon code’s validity period. This makes the call for action rather compelling.
WooCommerce discount with the coupon code on the sticky header:
WooCommerce deal with coupon details displayed on Sticky header
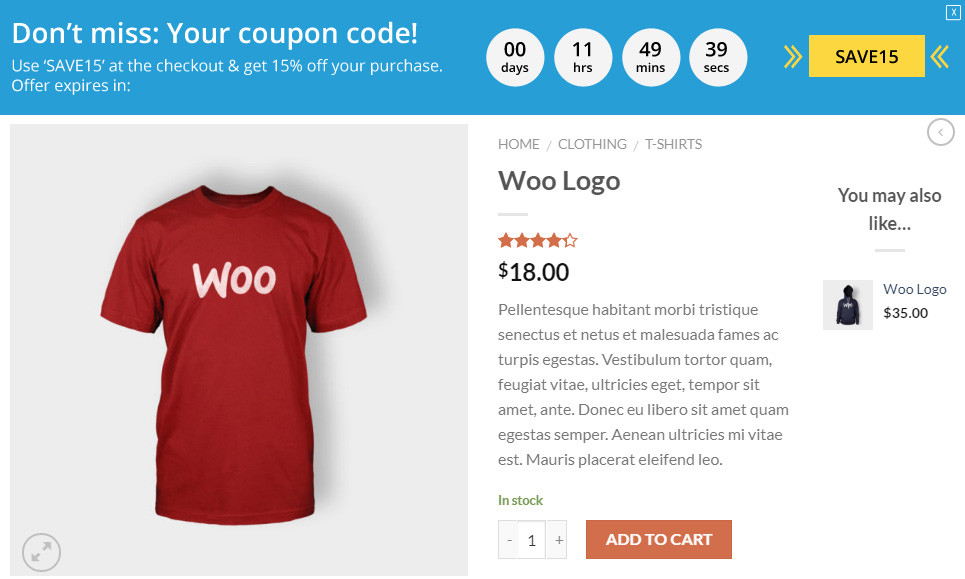
Currently, in WooCommerce, you cannot link coupon expiry to a ticking countdown timer. Also, there’s no way to highlight the coupon and deal details using a sticky header.
How to Set up WooCommerce Discount Coupon Code
Step #1: Create a new coupon code, say ‘Save15’ that offers a 15% discount:
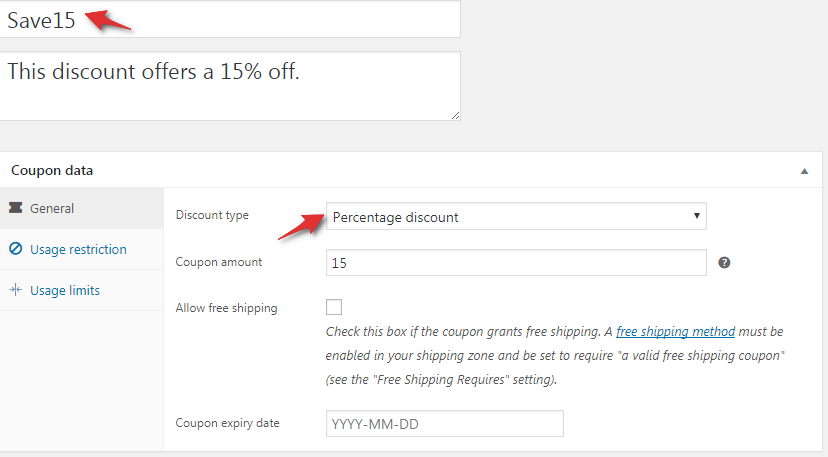
Creating percentage discount coupon code
Step #2: Go to Finale and hit ‘Schedule’ to select the period for which the coupon should be active
Step #3: Open ‘Coupons’ in Finale and you’ll have a plethora of extended options. Set the parameters like this:
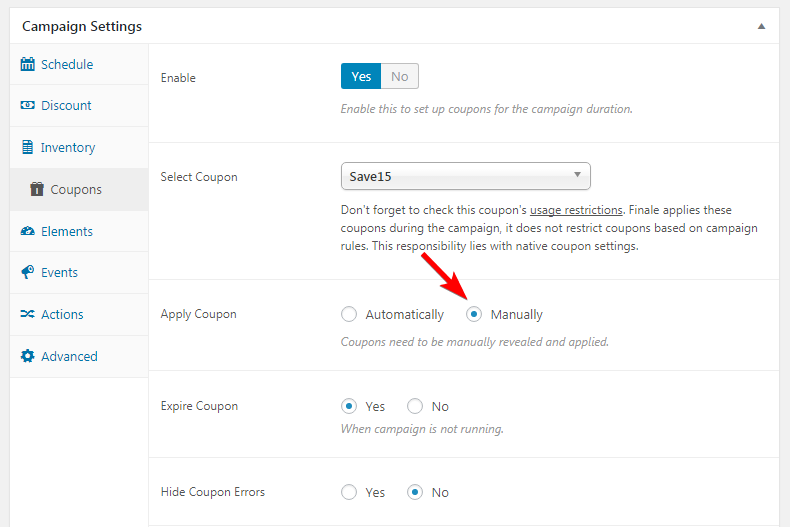
Making the WooCommerce discount coupon code manually applicable
Notice we have selected ‘Manually‘, it’s because we want people to enter the coupon code at the checkout. If you choose ‘Automatically’- the coupon code will get applied as soon as the item gets added to the cart. No, shoppers will not need the code.
Also, we’ve selected ‘Yes’ in response to expire coupon (when the campaign is not running) – this option will link the coupon code’s expiry to the countdown timer.
The next thing is to set up a sticky header/footer to highlight the coupon details. Refer point 2, step #4.
Tactic#4: Set up Festive Time Free Shipping Offers to Get a Bigger Pie of Shoppers’ Budget
Special occasions like Christmas, Black Friday, your store’s anniversary are great opportunities to increase store sales.
Need proof?
Mother’s Day online sales have been increasing by 15% year over year. An average American spends over $300 for the Independence Day.
It’s because people get a credible reason to shop and they need reasons to justify their purchase to their rational mind.
A free shipping offer that saves a customer $6.99 is more appealing to many than a discount that cuts the purchase price by $10. -Noted Wharton marketing professor David Bell.
You can get the most out of these occasions if you start your campaigns well in time. High-converting stores start them before their competition wakes up. Right timing ensures you get a bigger pie of shoppers’ budgets.
Go get your early mover advantage by starting in time with promotions.
Take a look at Annie 50’s exclusive free shipping offer. The occasion is their store’s anniversary.

You too can now run successful free shipping campaigns in WooCommerce with automatically applied coupon codes using Finale.
How to Set Up Free Shipping Campaign in WooCommerce
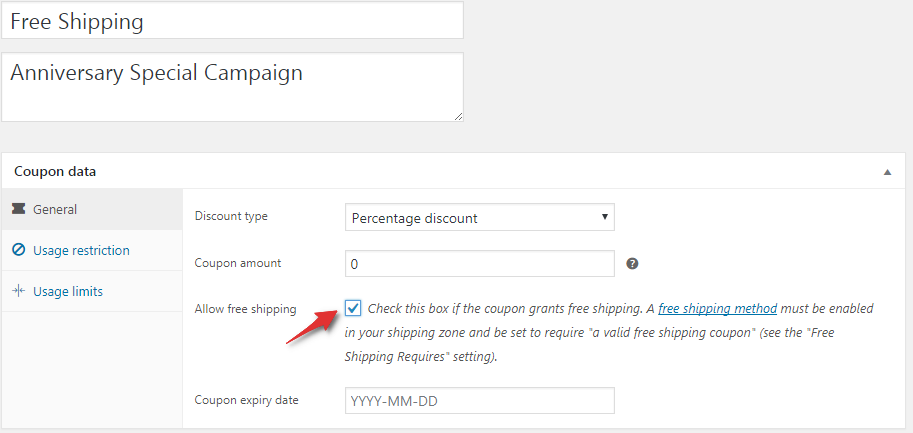
Step #1: Create a coupon in WooCommerce and enable ‘free shipping’
Step #2: Go to Coupons settings in Finale and set it up to make the coupon code ‘automatically’ applicable
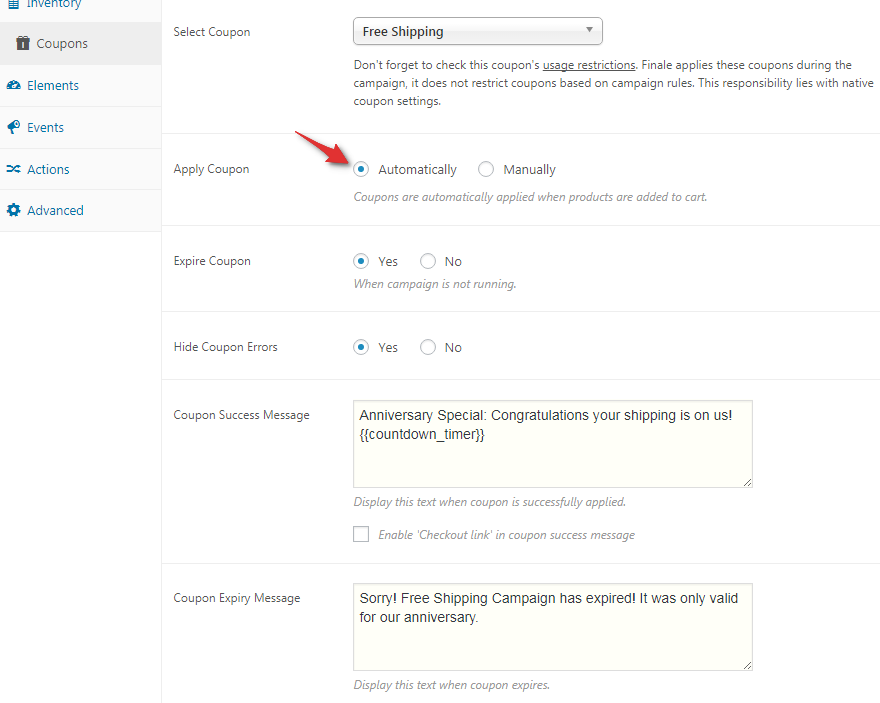
Making the Free Shipping coupon automatically applicable
We’ve selected ‘Automatically’ – apply coupon. The coupon will be implemented as soon as someone clicks the ‘Add to Cart’ button. They won’t need to input the coupon code anywhere.
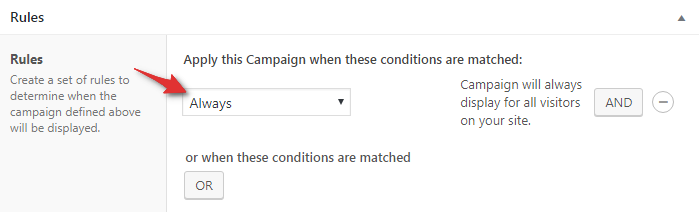
Step #3: Hit ‘Rule Builder’ and select ‘Always’ to run a store wide campaign (free shipping on all products across the store)
Step #3: Configure a sticky footer to inform shoppers that the shipping is free
The sticky header and footer settings are exactly the same.
So here’s how a sticky footer will appear on your WooCommerce site:
Anniversary promotions with free shipping in WooCommerce
Once the user clicks on the ‘Add to Cart’ button for any item, free shipping coupon will get automatically applied, and the shipping will become free. Looks easy? It indeed is.
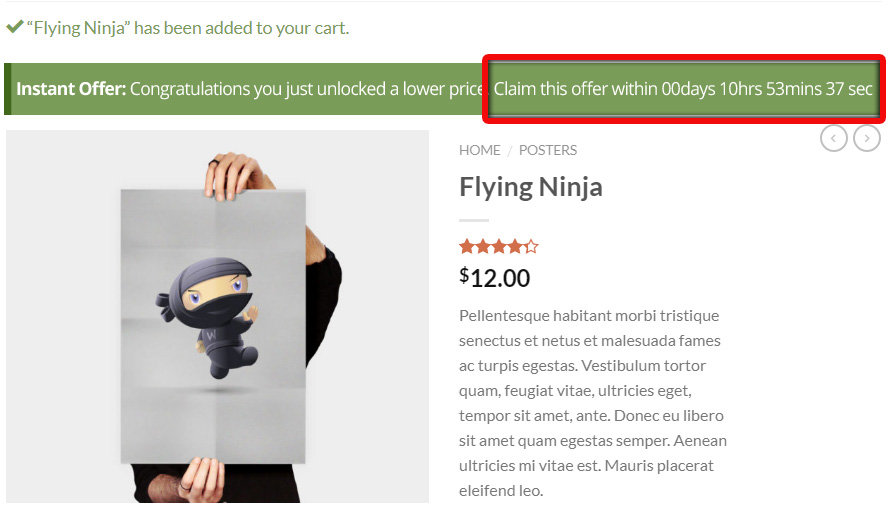
Tactic#5: Woo Shoppers with Product Page Discounts on Hand-Picked Products
Offering discounts on the product page is a great technique to push fence-sitters. It gives them a reason to choose action over procrastination.
Notice how an instant discount is highlighted on this product detail page:
You can offer instant discounts on hand-picked products on select days. And this will make the technique a lot more effective.
Also in Finale, once the instant discount gets applied, a ticking countdown timer gets attached to the shopping cart and follows shoppers through on the journey. This prevents people from abandoning their carts.
Here’s how a custom text box informing shoppers about instant discount will appear on your WooCommerce product page:
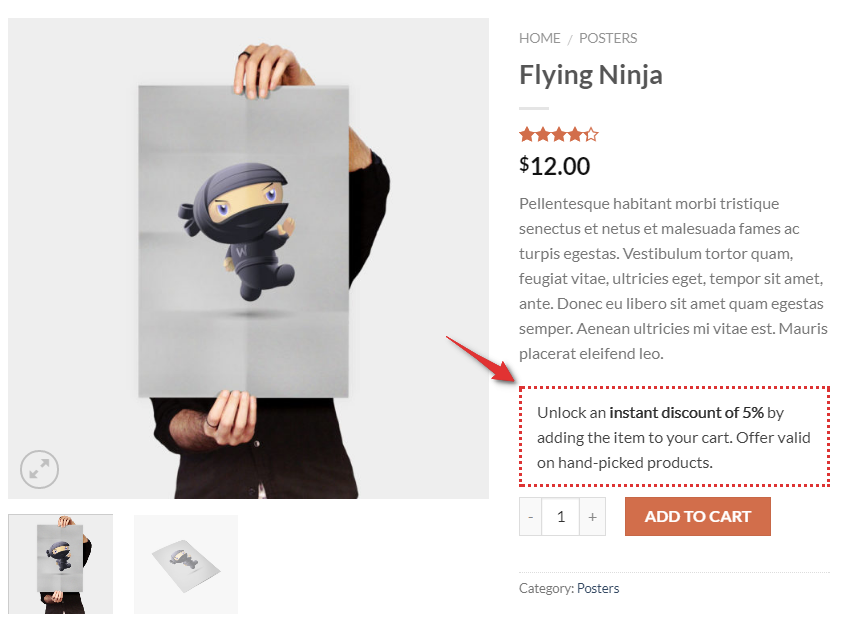
WooCommerce discount gets applied instantly when Add to Cart is pressed
How To Set Up Discounts on Certain Products & Display On Product Pages
Step #1: Schedule a campaign
You can select one-time or recurring, based on what you require.
Step #2: Go to discount tab and set the discount you want to offer
Pick from basic or advanced for the discount ‘mode’
Step #3: Create a new coupon ( as explained in tactic 3) and select auto apply this coupon code in Finale
You know the drift and are familiar with the options up until this point. So I’ll show you how to execute step 4, which is what you’re not familiar with.
Step #4: Select the ‘Custom Text’ for writing a message about the ongoing campaign
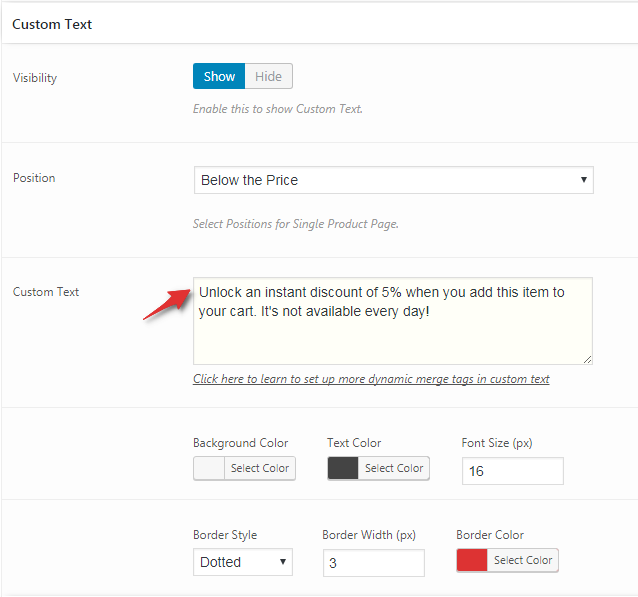
Setting up custom text box to inform visitors about the offer
Step #5: Select products for the discount from the Rule builder
Once this is done, update the campaign.
Now when the user hits the ‘Add to Cart’ button, here’s the screen they’ll see:
Instant discount gets automatically applied when the item is added to the cart
The notification at the top lets shoppers know the instant discount has been activated. Also, the countdown timer begins to tick that tells them about the deadline before which they should grab the offer.
As the user moves through the checkout journey, the timer follows them and keeps reminding them about the validity of the offer:
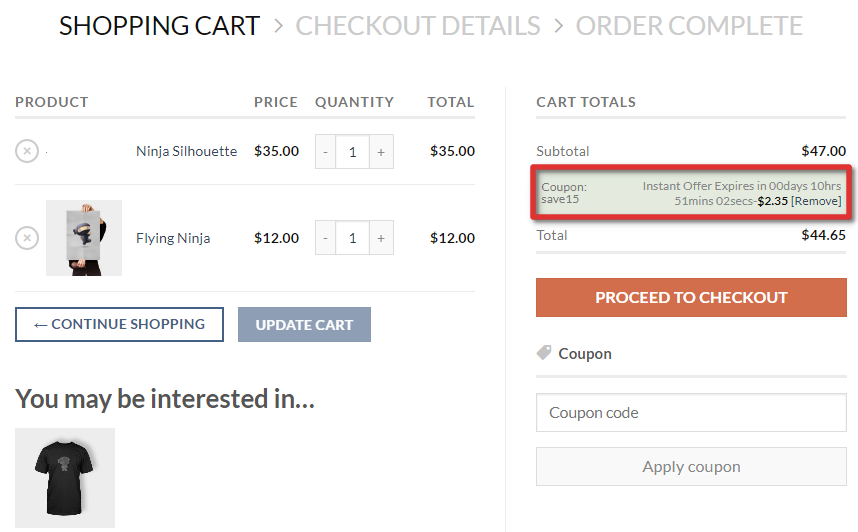
Countdown timer on WooCommerce shopping cart
The persistent countdown timer ensures shoppers don’t fall through the crack at any step of the way and keep moving till they get to the finish line. And of course, this prevents them from abandoning the cart.
It keeps reminding them that the opportunity to lock a lower price has an expiry date/time.
Sounds savvy? You bet, it is!
Nothing increases activity like creating urgency around a purchase decision. Simply adding a countdown clock to your online shopping cart or telling people a sale ends today is enough to spike conversions,” says Forbes contributor Drew Hendricks.
Tactic#6: Use Early Bird Discounts to Get Your Initial Sales
Early bird discounts are great for selling tickets, digital downloads and for physical products too. Use them to reward fast action takers.
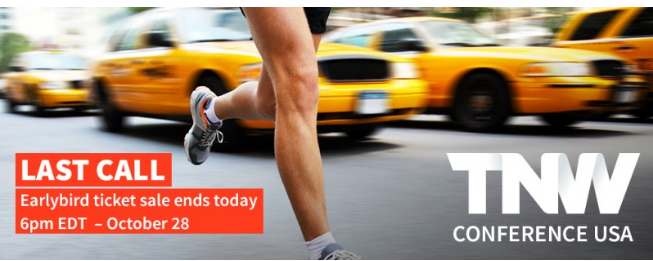
Early bird WooCommerce Discount on conference tickets
You can set up the Early bird discounts in your WooCommerce store such that:
The first ten buyers qualify for a specific discount amount, say X and next ten for say, Y, where X is greater than Y.
And the discounts will automatically disappear once a set number of people have bought that item. Here’s how you can configure this from ‘Events’ option in Finale:
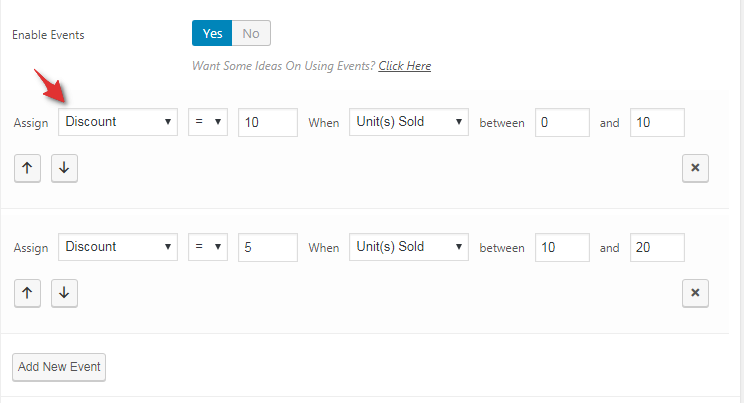
Setting up early bird discount in WooCommerce using Finale
Noticed the discount tiers? You can add more of these tiers.
The discount amount will become zero, and the price of the item will restore to normal once 20 people have bought the item.
You can even change the Add to Cart button text during the campaign, this is how it would appear:

Early Bird Promotion Offer in WooCommerce (With change in button text)
You could run this campaign to offer clearance discounts too. And can set it up such that the last ten items are available at a clearance discount of say, X%.
Tactic#7: Put a Limit on the Number of People That Can Grab the Deal
A study by Wageningen and Tilburg Universities showed that people believe scarce items are more popular.
They believe that if the supply is limited, it’s because the demand is high and this attracts them to scarce items compared to the ones with enough stocks.
Take a look at how this eCommerce store is exploiting the power of limited edition by informing people that they only have a 100 of those:
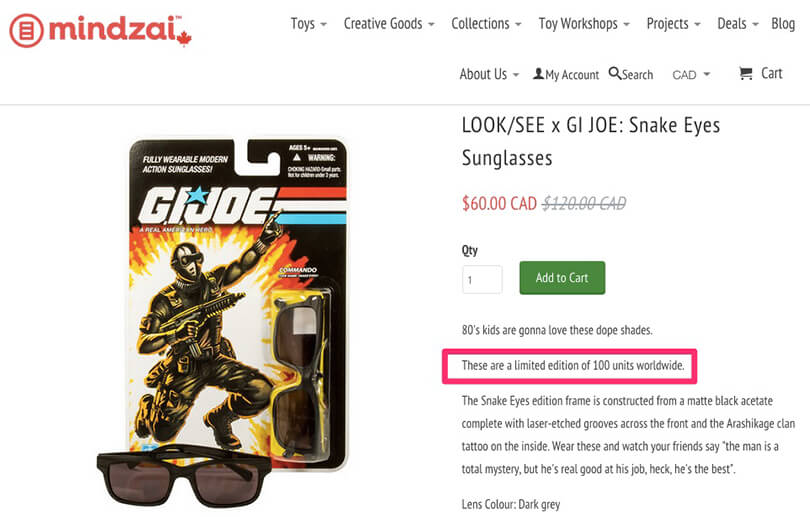
By putting a limit on the number of items they can sell, they are compelling shoppers to buy before stocks run out.
An interesting case study: As per Monetate.com, an online retailer conducted an A/B test. Version A was without the scarcity bar and the time limit, the Version B was with them:
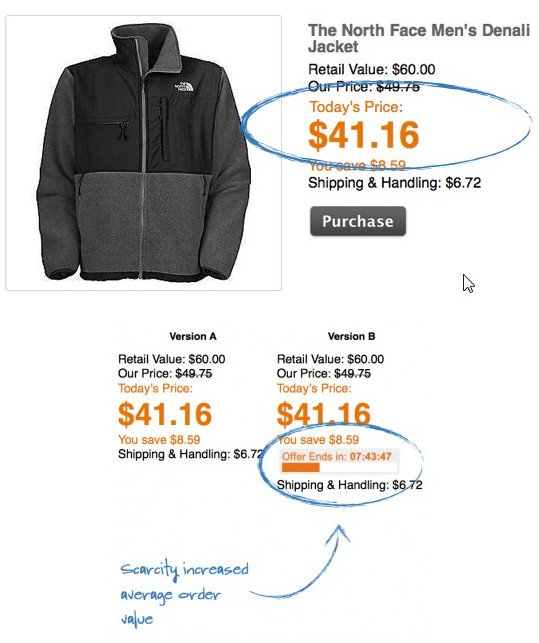
Version B increased average order value by 0.07% and this translated into a million dollar + increase in the company’s revenue.
Scarcity marketing is a powerful weapon in your arsenal and can help you boost conversions.
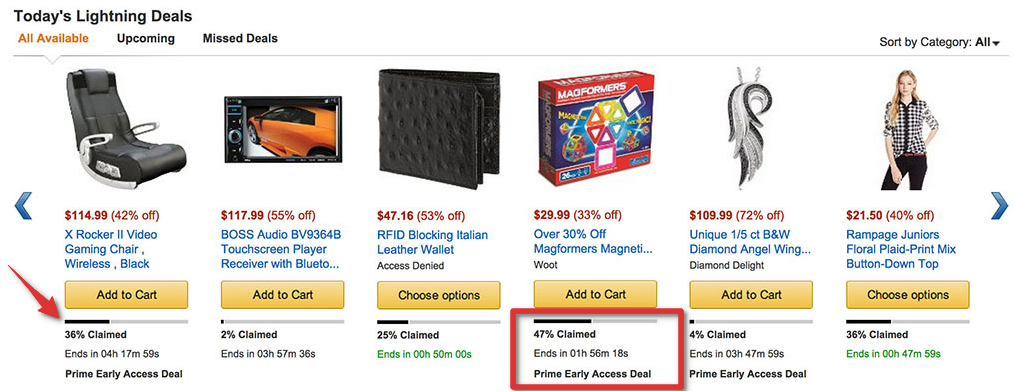
Take a look at how Amazon displays counter bar on its products showing the real-time deal status:
I’ll show you how to set up a similar counter bar in WooCommerce.
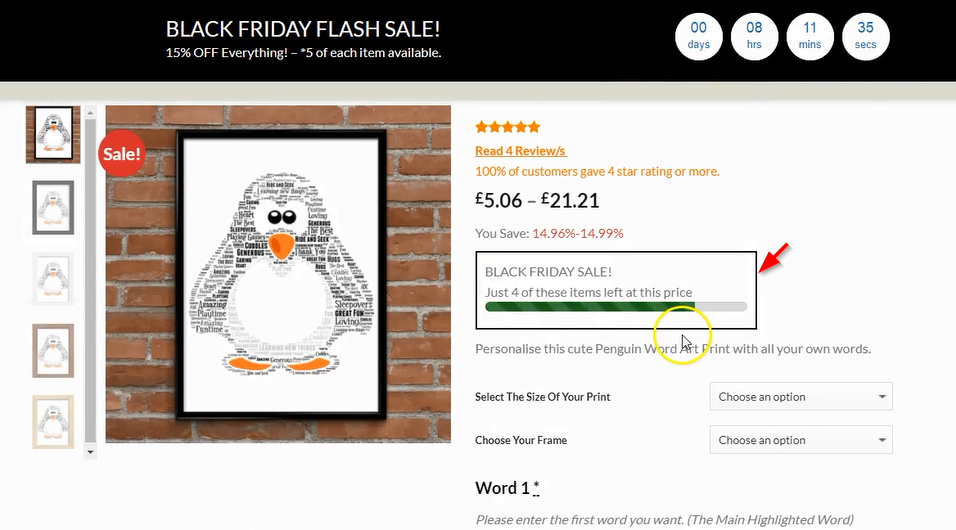
Here’s how the counter bar will appear on your WooCommerce product page:
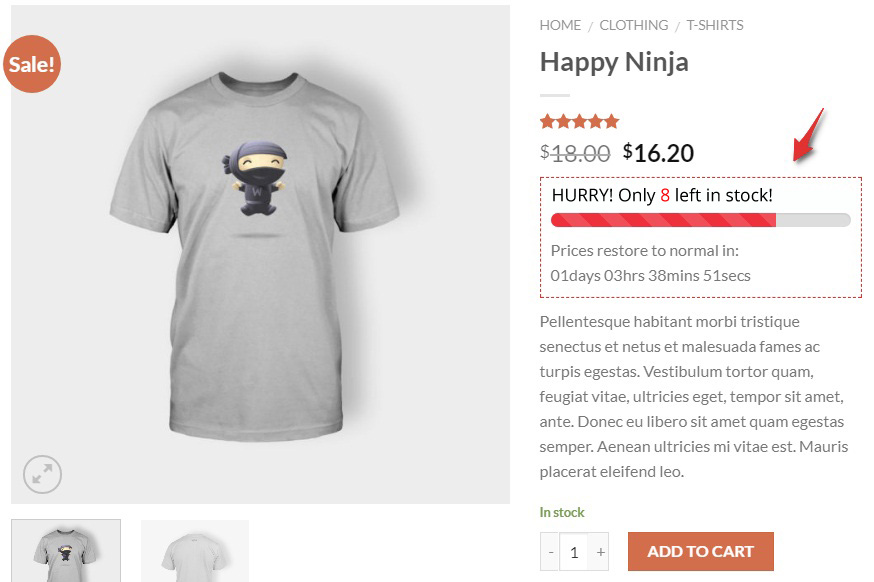
WooCommerce deal with a limit on the number of buyers
The red counter bar that you can see in the image gives a real time account of the items left. To configure the counter bar on your product page, follow these instructions.
How to Set Up Limited Stock Campaign in WooCommerce
Step #1: Go to Schedule tab and select fixed campaign type
Set the start date/time and end date/time.
Step #2: Hit the inventory tab and configure settings
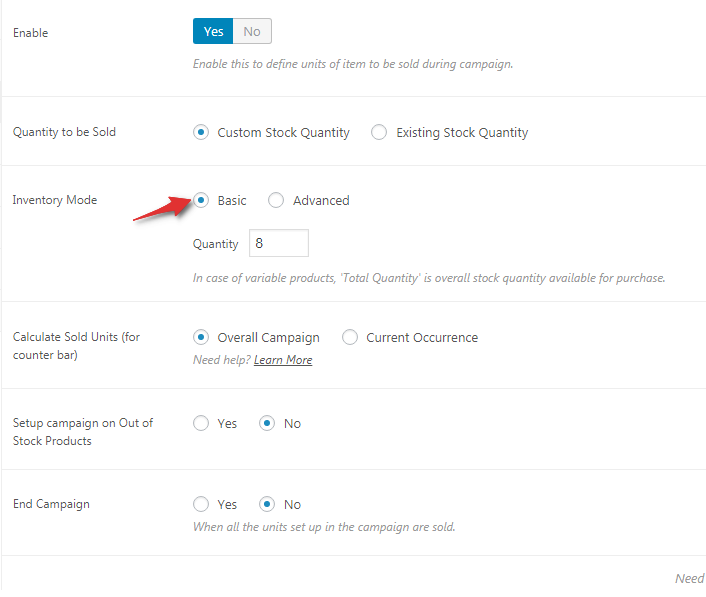
Adding custom stock quantity in WooCommerce Inventory Settings
I’ve selected ‘Custom Stock’ Quantity because I have an inventory goal of 8 units. It means I have eight units available to sell at the given cost. If I select ‘existing,’ it will pick up the actual inventory size from the product page.
Also, I’ve excluded the out of stock products from this campaign.
Step #3: Set up the counter bar for the product page
Configure the counter bar and its appearance (the color, border, background, etc.) and the display messages.

You also have the option to keep the counter bar invisible till a set number of people have purchased the item
Also, you can use dynamic merge tags to display messages like ‘2 items sold out of a limited stock size of 8 units.’ – Here ‘2’ is coming from the back end and is updated in real time. It will keep changing as more and more people buy.
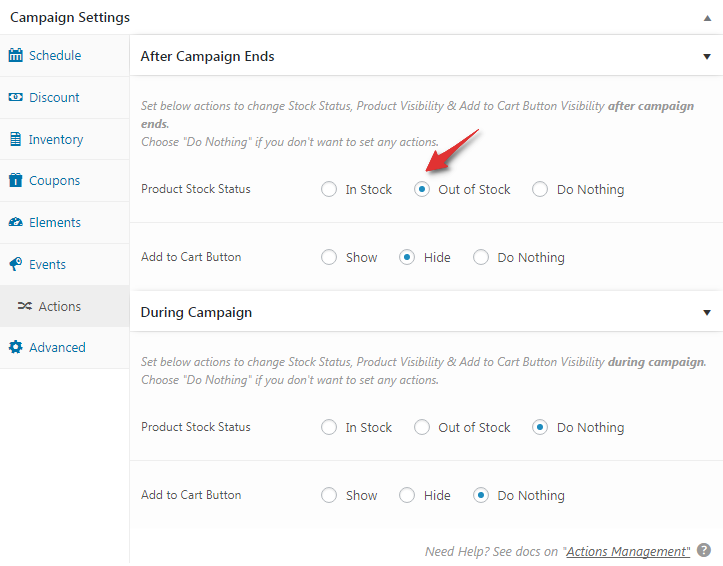
Step #4: Set the ‘Add to Cart’ button to become invisible after the campaign ends
Next, go to rule builder and select the products to run the campaign. You know how that’s done.
Update it and the counter bar will begin to show up on the chosen product pages exactly like in the image above.
Here’s how one of Finale users set up counter bar in their store:
They put a limit on the number of people that can buy the item at a discounted price. And hence giving a solid reason to shoppers to hurry up.
Tactic#8: Offer Special Discount to Hand-Raisers During Pre-Launch Campaign
Building hype around a new launch is an insanely effective strategy to ensure you’re not launching a new product to the sound of crickets.
You can collect email addresses of visitors interested in the product and send them exclusive offers when you launch.
Harry’s, a new men’s grooming brand invited people to leave their email addresses to be notified about the launch. As per an article published on Tim Ferris’s blog, they collected 100,00 emails! This is not a small deal!
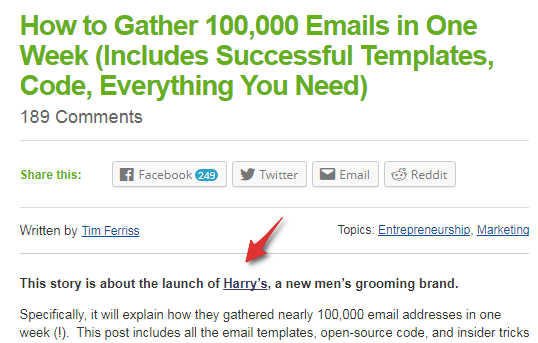
Imagine having 100,000 people to send emails to about the new product launch! Here’s their pre-launch page:
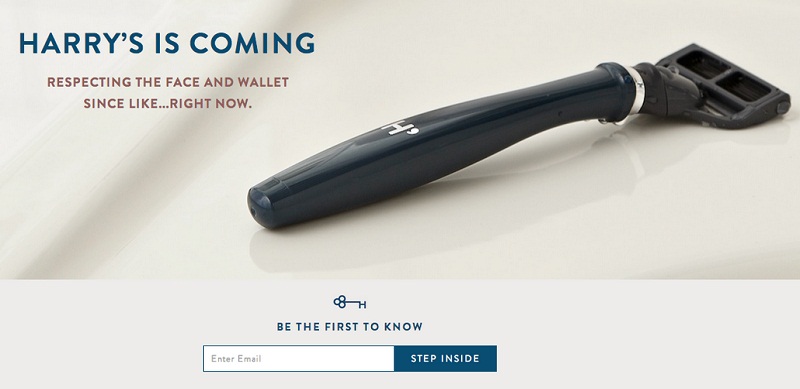
Pre-launch campaign on Harry’s
How To Set Up a Pre-Launch Discount Campaign in WooCommerce
Step #1: Create a form with name and email as the form fields
You can use any contact form creation plugin like WPForms, Gravity Forms, Contact Form 7. I’ve used Contact Form 7 to show you how to go about it.
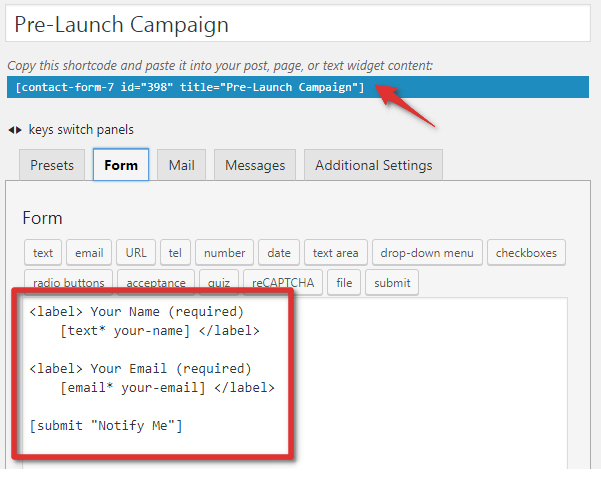
Creating a form to collect email ids during pre-launch
After you create the form and hit update, it will give you a short code at the top. Copy this shortcode and keep it handy, I’ll show you where to paste it.
Step #2: Paste the shortcode in ‘Custom Text’ under Elements in Finale
Here you can write the custom text that you’d like to display on the product page of the soon to be launched product. Also, paste the short code here:
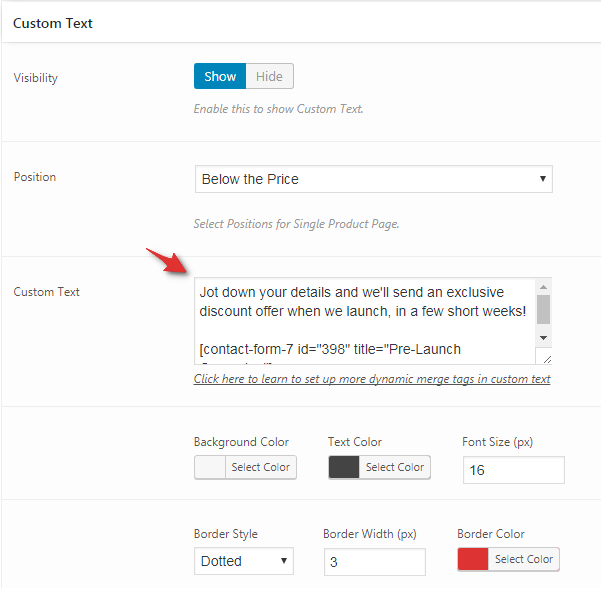
Pasting the Contact Form 7 short code on custom text box
Notice here we’re inviting people to leave their details so that we can contact them when the product hits the shelf. Also with the message, we’re promising them an exclusive launch offer in form of a discount when we launch. Baits work wonders.
When you launch your product to hand-raisers and offer a courtesy discount, their likelihood of converting are higher, because they’ve already committed to you by submitting their email.
Step #3: Set up and start the countdown timer to build hype leading to launch
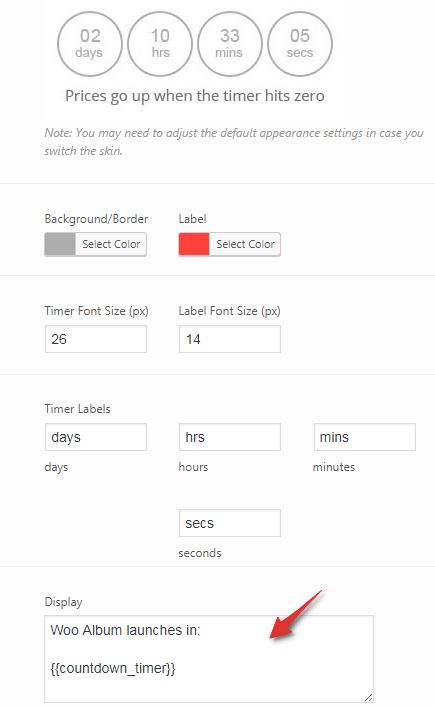
This is optional- you may not run the countdown if you don’t want. You can only set up the custom text box with the message. It will automatically disappear when the campaign ends.
Here’s how it will appear on your WooCommerce product page:
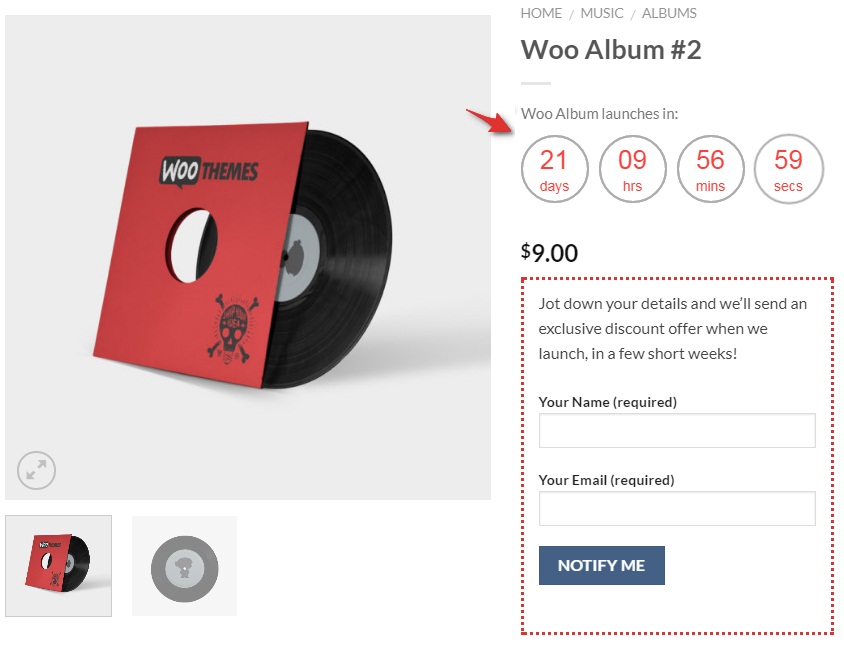
Pre-launch campaign with countdown timer on WooCommerce product page
Did you notice something interesting?
There’s no “Add to Cart” button competing with the “Notify Me” button. The conversion goal of this product detail page is singular. We’re not confusing the visitors by giving them two competing buttons. This is what leads us to the next step:
Step #4: Go to ‘Actions’ and hide the Add to Cart button during the campaign
Here’s how you do it:
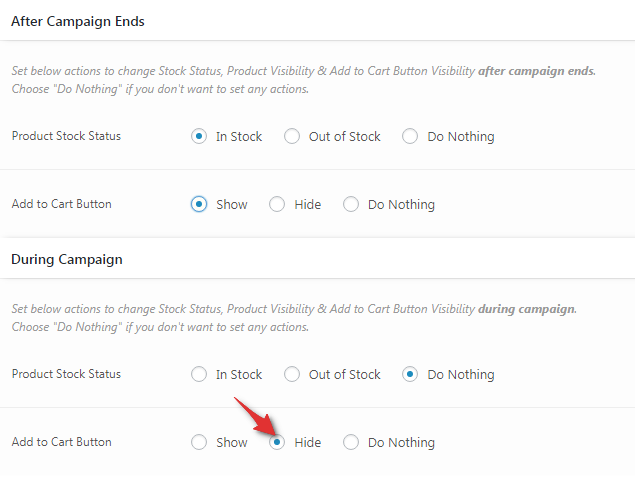
Now when you update this the Add to Cart button will stay invisible during the duration of the campaign.
Once the campaign ends and your product is finally available for purchase – the ‘Notify Me’ form + custom message will disappear automatically and the Add to Cart button will start to show.
Tactic#9: Embed Countdown Timer in Emails to Increase Click Through
Urgency-inducing flash sale emails jolt dormant subscribers into action. They give them a specific deadline to take action and a solid reason to ditch overwhelm and excuses.
As a store owner, emails should be an important part of your strategy. If it isn’t, make it. If you’re already sending out emails, I’ll show you how to make them more effective.
Email marketing was ranked as the best channel in terms of return on investment, with 68% of companies rating the channel as ‘good’ or ‘excellent’.
Source – eConsultancy
Here’s a super persuasive email from Barnes & Noble. Notice they’ve put a countdown timer front and center:
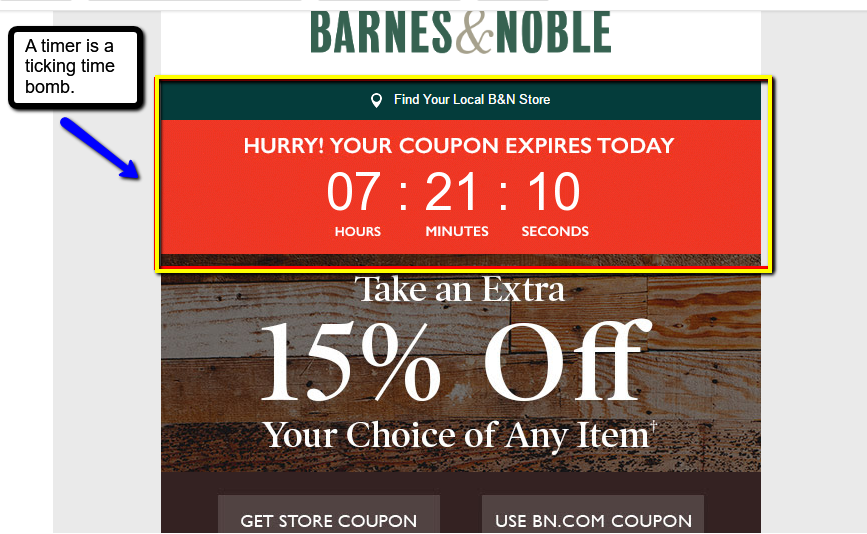
This email gives you the most important information first i.e. the time you have to lock your purchase and save money. You just can’t miss out on the time-limit on the offer when you open it.
Now you too can now generate a short code for a countdown timer by setting up a Finale campaign and embed the time into your email.
Here’s how to go about it:
Step #1: Hit ‘Generate Short codes’ and you will have a multitude of timer skins to pick from
Here’s the screen you’ll see when you generate short code:
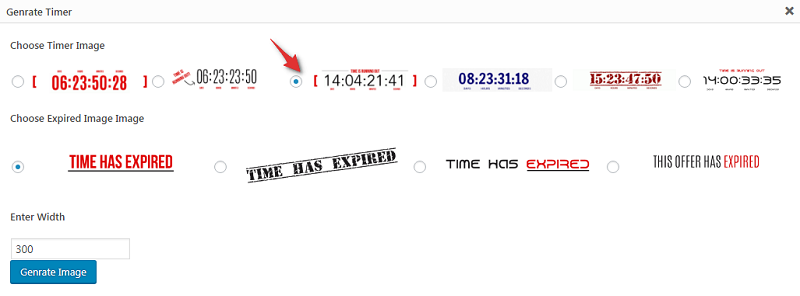
Choose from countdown timer skin options and generate timer
Pick the display images you like, enter the width below and hit ‘Generate Image’.
Step #2: Grab the short code from the preview screen
The timer will be generated as per your inputs in the previous step and you’ll get access to the short code. Copy it.
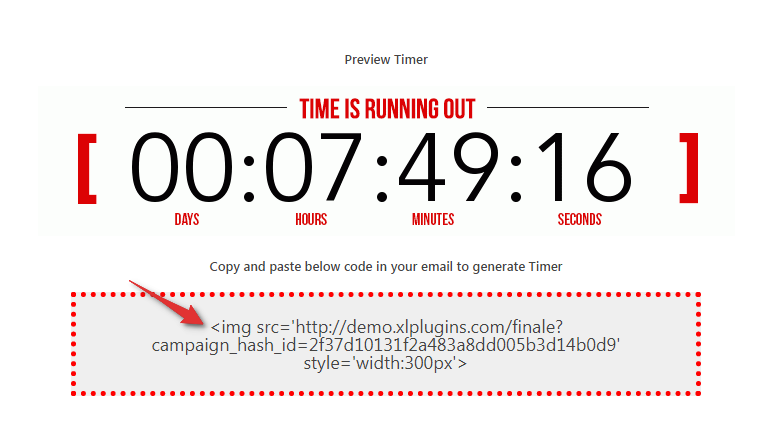
Copy the countdown timer short code
Step #3: Paste the short code in your email template
Select ‘Source’ or HTML box in your email template and paste the code here. It will print the timer as shown in the image below:

Paste the countdown timer short code in MailChimp
We’ve used Mail Chimp but you can use any Email Service Provider you’re comfortable with. It even works with Gmail!
A ticking countdown timer won’t let people sleep on their decision and will induce an insistent urge in them to take fast action.
What’s next?
Ambitious store owners never say die.
They always know there’s room for improvement and making things better.
They never settle for the conversion rate they have and continue to deploy better techniques to get better results.
Finale is designed to be a tool that empowers you while you’re on that journey of improving, advancing and getting better at your game.
It is the only tool in WooCommerce that lets you deploy time-tested, psychology-backed principles of urgency and scarcity.
It helps you create promotional campaigns to convert more prospects into confident buyers.
The best part?
What you saw in this post was just the tip of the iceberg.
The possibilities are as limitless as your ambition is!
So what are you waiting for?
Get your copy of Finale today and make your store the high-converting asset it’s meant to be!