WooCommerce Deals: How To List Your Deals & Offers on a Single Page

 I am sure, you know that lucrative WooCommerce deals can translate into an instant revenue jump for you.
They can turn cold visitors into red hot buyers.
In this post, I’ll show you how to create deals/offers, segment them and present them on dedicated deal pages.
For e.g: ‘Deals under $25, Daily Deals, Tuesday Specials, New Spring Collection, Best Gifts for Mother’s Day’ etc. to browse the related collection.
We’ll learn all this, using the new add-on module called Deal Pages in Finale Sales Countdown Time and Discounts Plugin.
WooCommerce store owners have always been asking about best ways to create & display daily deals and this is it!
Contents
- Why Should You List All Your WooCommerce Deals on a Single Page
- Watch This Instructional Video to Set Up Deal Pages in Your WooCommerce Store
- Step by Step: Set Up Discounts on Products & Call Them On A Single Page
- List All Your WooCommerce Deals On a Single Page
- Set up Deal Pages & Give Visitors An Instant Access To Them
- Additional Tips to Direct Traffic to Deal Page
- Conclusion
Why Should You List All Your WooCommerce Deals on a Single Page
When you list all your special deals on a single page, people will not have to scout for them elsewhere on the site. This lets them browse your collection based on their interest.
Here’s an example from Think Geek that does exactly what Finale Deal Pages can do for WooCommerce:
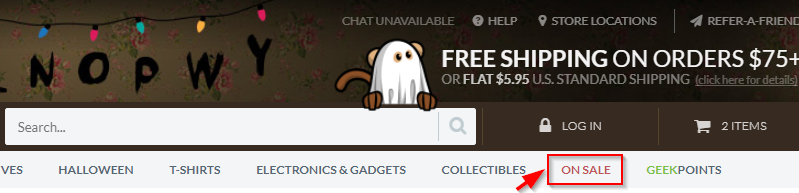
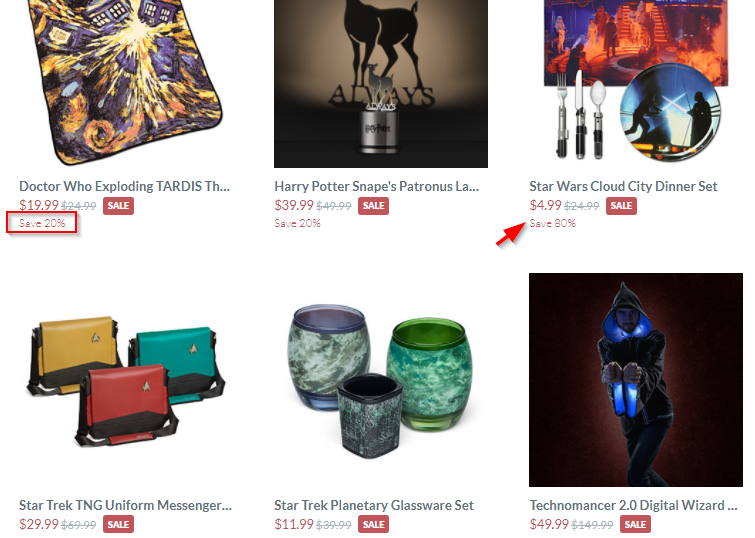
When you click on the link ‘On Sale’ in the navigation menu you can see all the deals listed one below the other.
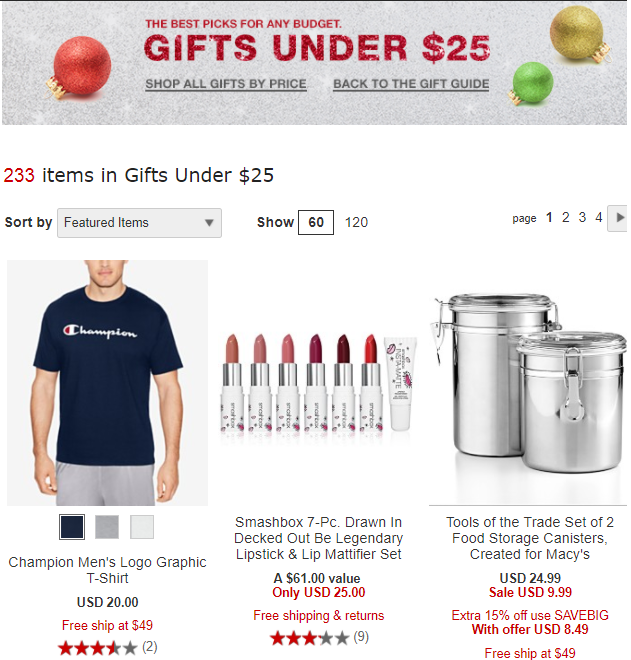
Here’s another brilliant example from Macy’s. They’ve got the gifting guide on their store:

The shoppers can simply select their budget and they will be led to the page listing all the deals under the chosen price point on a single page:
You can do the same for your WooCommerce deals. Let’s take a look:
Watch This Instructional Video to Set Up Deal Pages in Your WooCommerce Store
Set up WooCommerce deals and list all the discounted items on a single page.
Let’s take a specific example to set up a dedicated promotion page.
Step by Step: Set Up Discounts on Products & Call Them On A Single Page
The first step is to create WooCommerce deals that can be further curated on dedicated pages.
To do that, install Finale in your WooCommerce store and then follow the process.
Case #1: Set up a 15% discount on all items priced under $100 and display them on a single page.
Here is the step-by-step approach to follow:
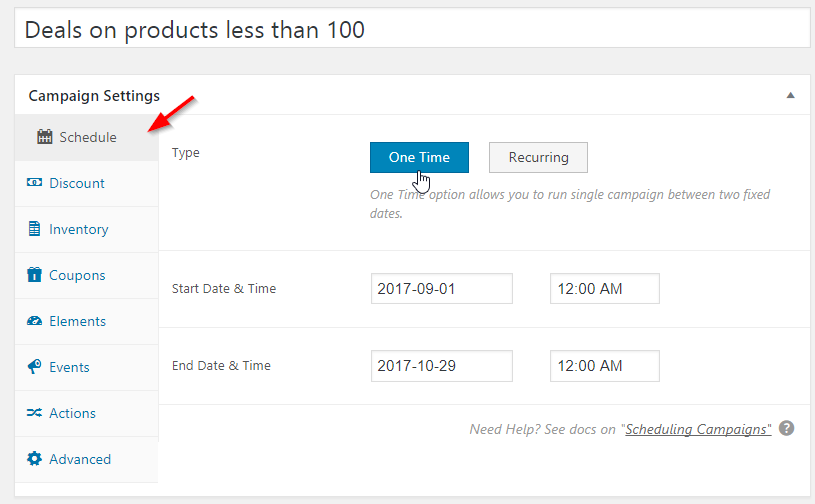
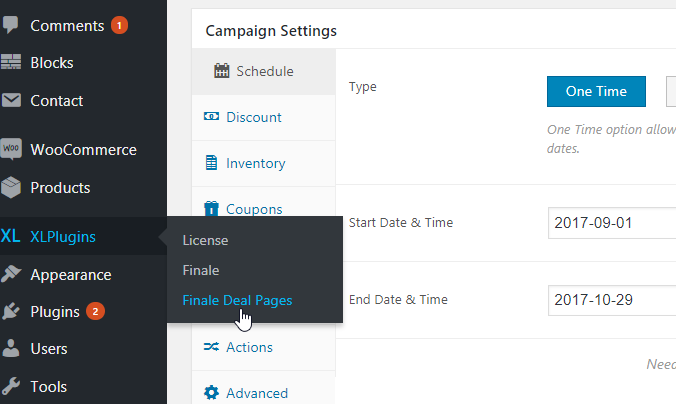
Step #1: Schedule a One-Time sale
In Finale, there are two types of sales you can schedule- One Time and Recurring. Since we don’t want this sale to recur after a certain interval, we’ll select One Time:
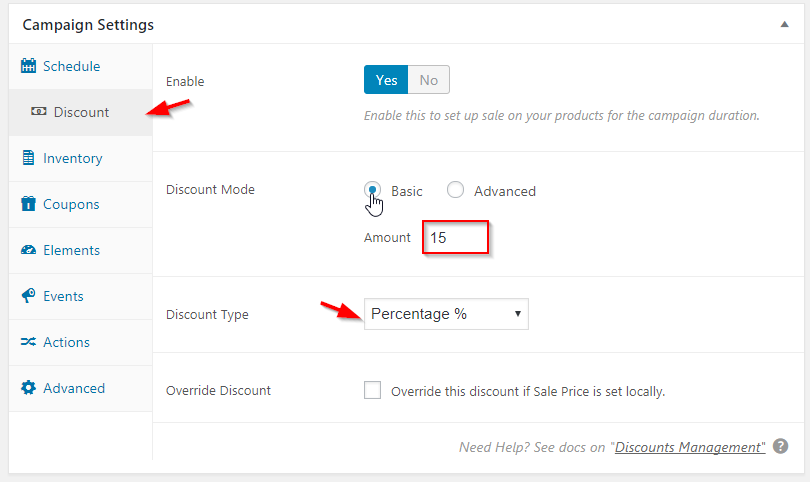
Step #2: Select ‘Basic’ percentage-based discount
There are two discounting modes: Basic and Advanced.
Basic allows you to set one flat discount rate whereas advanced is for tiered discounts (or different discounts on different products based on their price).
We’ll select basic mode and percentage-based discount:
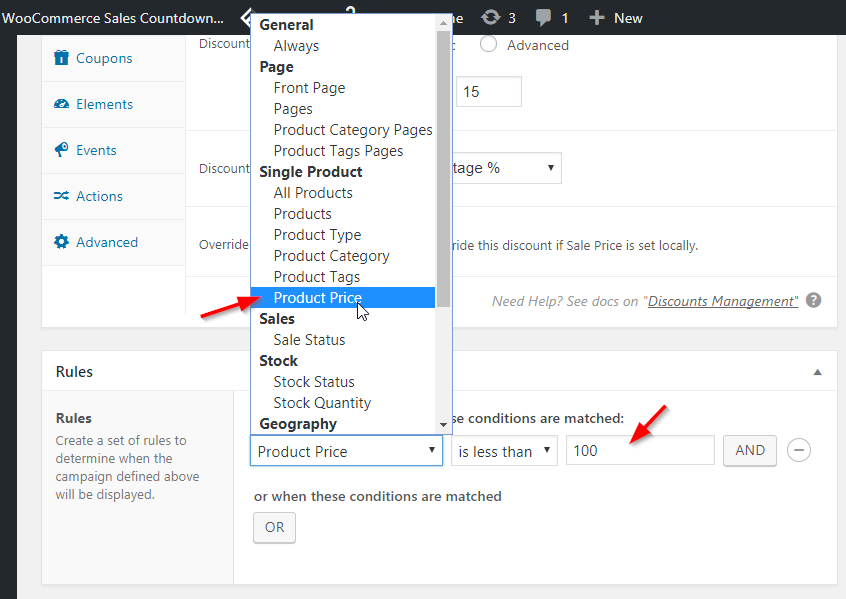
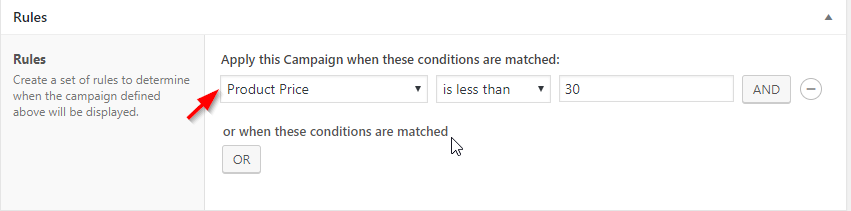
Step #3: Choose ‘products under $100’ to apply the discount
The Rule builder in Finale gives you access to a multitude of rules, one of which is product price.
So you can set the discount based on the product price.
Once you’ve selected ‘product price’ from the drop-down, the next thing is to select the option ‘less than 100’:
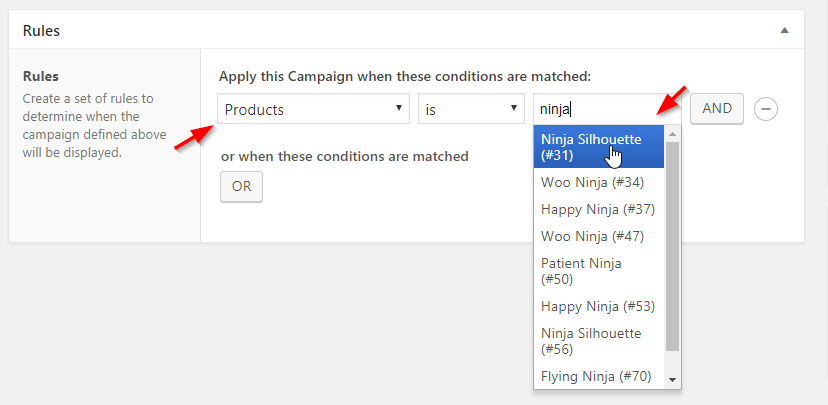
Alternatively, you can also pick ‘Products’ as an option on the drop down and enter specific products to offer discounts on hand-picked products:
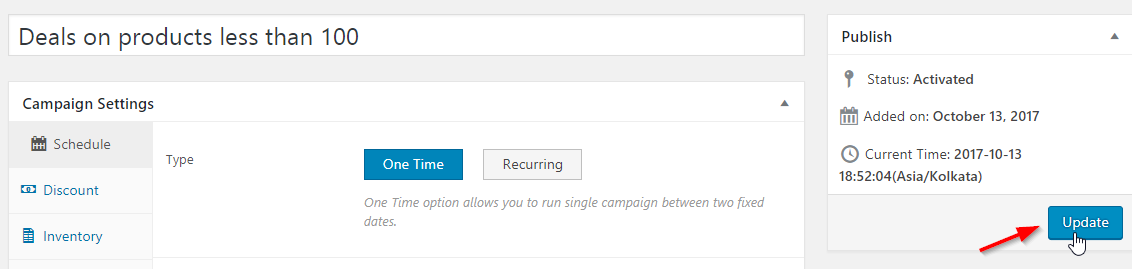
Step #4: Update the campaign
Press update to save and schedule the campaign:
Step #5: Select Finale Deal Pages from the main menu
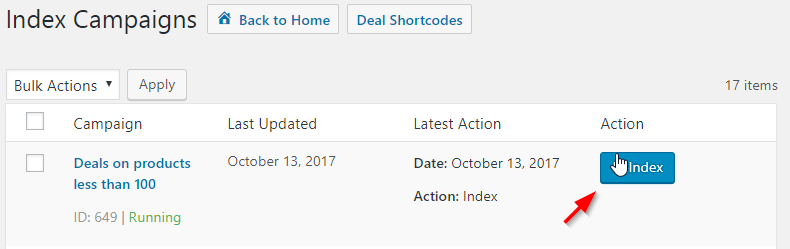
Step #6: Index the campaign
To list all the discounted products on a single page, you’ve got to index the campaign first.
Indexing runs a background process and associates products with the campaigns.
This is done to optimize the query to all the load products for a particular campaign.
Once you have indexed the campaigns click on “Deal Shortcodes” button at the top.
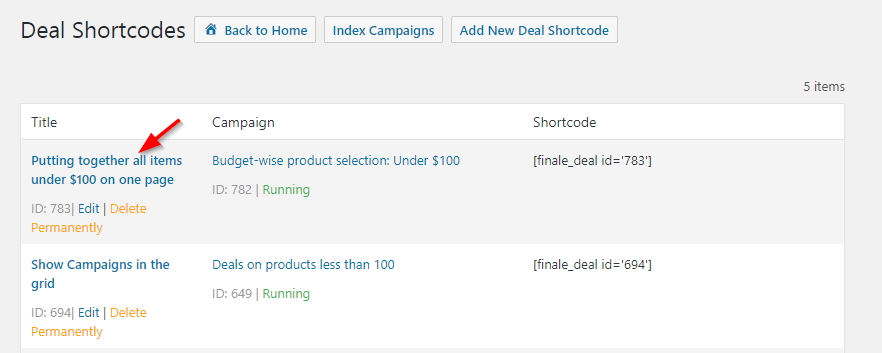
Step #7: View the existing generated shortcodes or “Add New Deal Shortcode”
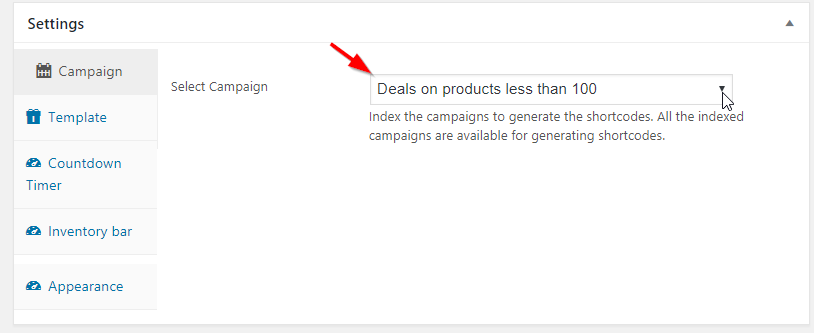
Step #8: Select the campaign name from the drop down
After the campaign is indexed, it will start appearing the drop down. Choose the specific campaign you created:
Step #9: Choose the display format from ‘List’ and ‘Grid’ for your deals
This is where you select how you would like to display all the deals on a single page.

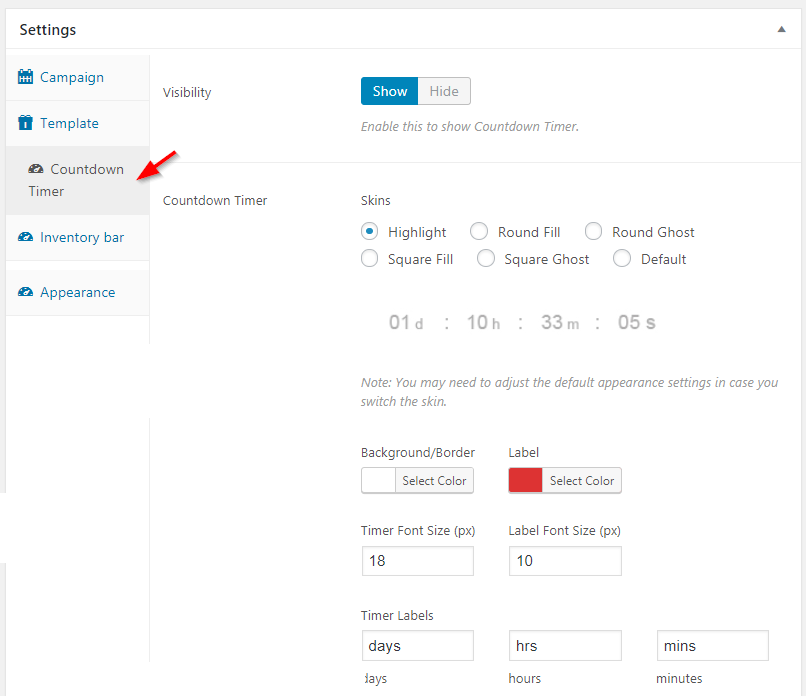
Step #10: Want to show a countdown timer on the deal page? Configure it.
Click on the ‘Countdown Timer’ option on the menu on the side and configure all the options:
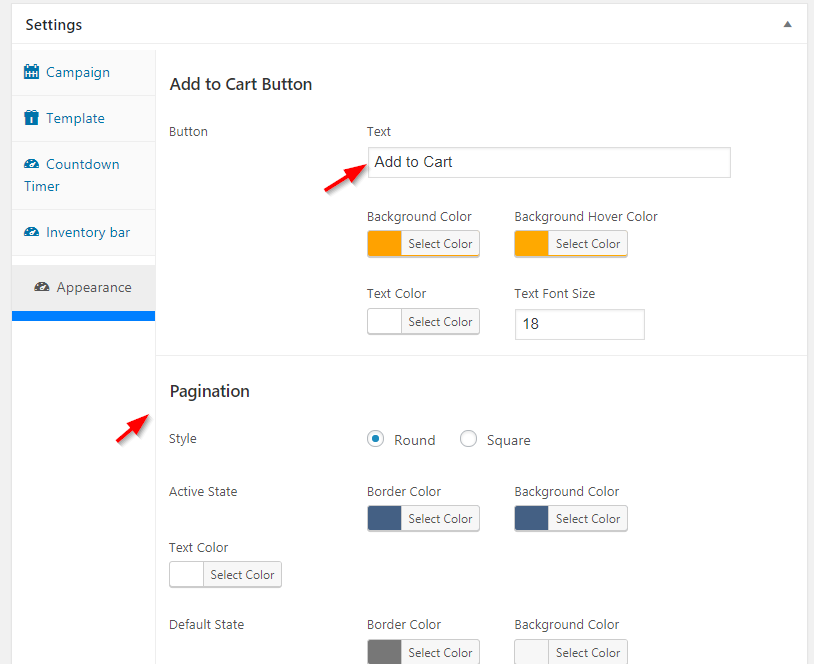
Step #11: Set up the appearance ( Add to Cart button, Pagination and Other) for the deal page

Step #12: Grab the campaign shortcode and paste it on a new page
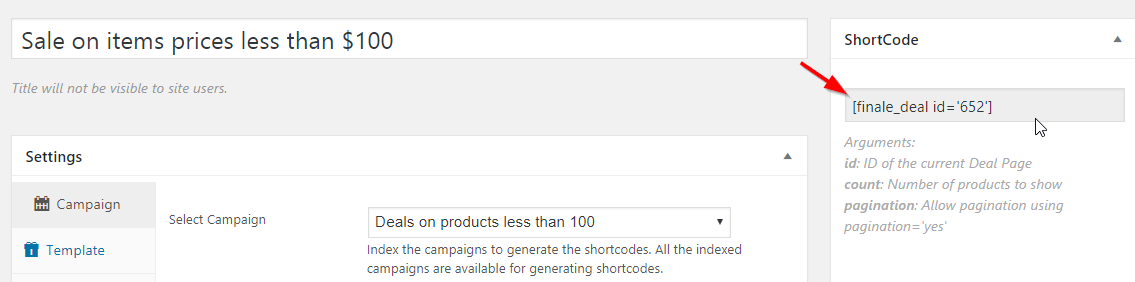
Step #13: Create a new page and paste this shortcode
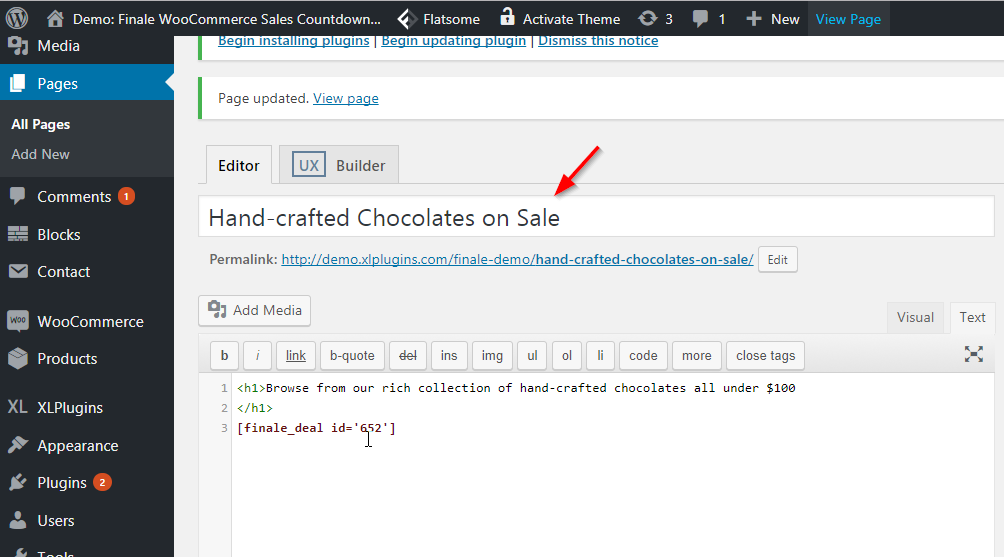
Next, update and save the changes. You’re on the roll!
List All Your WooCommerce Deals On a Single Page
After you have followed the above steps, your attractive deals page is ready.
This is how it will appear: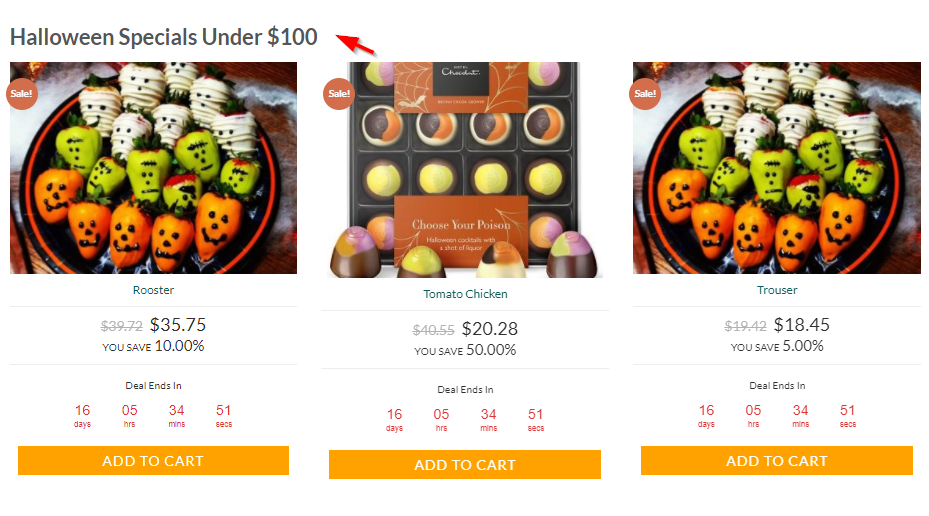 Here’s a GIF of the scrolling deal page:

Here are some more ideas to turn your WooCommerce deals into sales & profits:
Set up Deal Pages & Give Visitors An Instant Access To Them
It doesn’t need to be Black Friday or Christmas to run offers on your site. Some of the most successful sites run offers throughout the year.
They have a link on their navigation bar that leads visitors to the on-going deals. This is insanely helpful because it can convert visitors who perhaps didn’t even come with an intention to buy.
1. Put all your deals at a certain price point together to attract budget-conscious shoppers
This is great for price-sensitive shoppers. They can shop by the discount percentage or the price point. Here’s how popular store, Love Lula does it: 
You can select all the deals under a set a price point through the rule builder section:
2. Put all the deals exclusively available to the site members on one page
Take a look at this exclusive offer page link on the Ikea website. The deal is exclusively reserved for the website members. The 20% discount cannot be claimed by everyone.

Take a look at how you can use the rule builder section to make the deals available only to the members of the site:

3. Segment deals based on the remaining stock quantity
You can put up a clearance sale and give shoppers an instant access to that page. Take a look at how Ikea does it: 
Let me show you how you can select all the items in a specific category with a stock quantity running low.

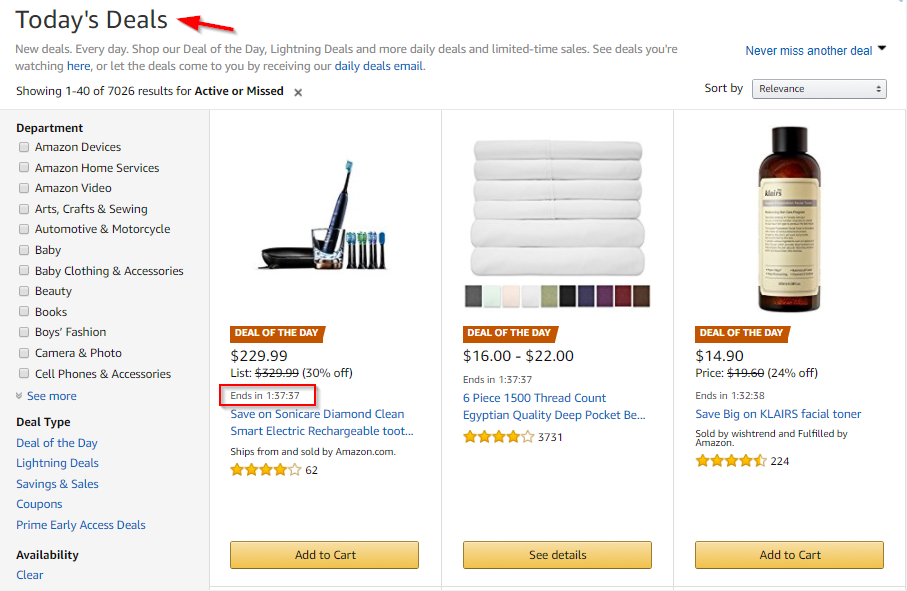
4. Put together all your ‘Today’s specials’ on a single page
Here’s a brilliant example from Amazon.com.
They have listed all the Today’s special deals on a single page. And visitors get instant access to that page through the navigation bar even when they’re not running any promotions:

Here’s how you can use the rule builder section to segment all the deals by the day/date: 
Some tips to direct traffic to your WooCommerce deals:
Additional Tips to Direct Traffic to Deal Page
Tip 1: Create a Sticky Header with a CTA button leading visitors to this page. And make this sticky header active on your store pages

When one clicks on the ‘Browse All Deals’ button on the CTA, you will be directed to a page with all the deals listed one below the other.
Tip 2: Create a new link on the Menu and name it “Hot Deals” or “Today’s Special”, ” On Sale” or anything related to your ongoing promotions.
See how Amazon does it.
Conclusion
Promotions are around the corner and this is the time to gear up.
Put your best deals forward.
Finale and its new feature of deal pages will allow you to achieve your promotion goals with ease.
Discover more about Finale Sales Countdown Timer & Discounts Plugin with the new Deal Pages add-on.
Think. Imagine. Execute.
Here’s wishing you more sales during the festive season!