How To Use "Bounce Back" Campaign To Drive an Additional 127 Sales in 30 Days

Ever since the day you started your e-commerce store, how many blogs have you read like these:
“17 Tactics To Drive More Sales”
“60 Tips To Increase ECommerce Sales”
“91 ways to increase store sales”
I am sure lots. When you search ‘increase eCommerce sales’, a billion odd results pop up.
When you search ‘increase eCommerce sales’, a billion odd results pop up
Long lists of tactics & tips but not one actionable takeaway that you can actually use. Phew!
There’s a reason behind this:
99% of these blogs are a collection of tactics based on pure research. Their writers haven’t spent time in trenches and aren’t speaking from a place of experience.
Today I want you to meet someone who is.
It’s Drew Sanocki and here’s what he’s picked up from his time in the trenches while turning around a dying store.
Contents
- 127 Additional Sales In a Month With This Automated Post-Purchase Email
- The #1 Reason Why Bounce Back Campaign Is So Slick
- How To Set Up The Bounce-Back Campaign In WooCommerce?
- Step #1: Create a new thank you page with NextMove and set up a rule
- Step #2: Create a new coupon code in native WooCommerce
- Step #3: Personalize the Thank You coupon code & add a deadline to it in NextMove
- Step #4: Choose specific products to give them ideas for next purchase (Optional)
- Step #5: Append this coupon code box in your WooCommerce order emails
- Implement This Nifty Tactic Today, Here’s Why
127 Additional Sales In a Month With This Automated Post-Purchase Email

Drew Sanock took charge of Karmaloops.com and turned it around
Drew Sanocki, co-founder at NerdMarketing.com took charge of marketing for an online street apparel store, Karmaloop when it was at the brink of bankruptcy.
The major problem, with Karmaloop, was that it had a low average order value and high paid search costs. So they were losing money on almost every order.
Sanocki used the bounce back campaign to turn the company profitable within short 10 months!
Take a look at the results from the bounce back campaign:
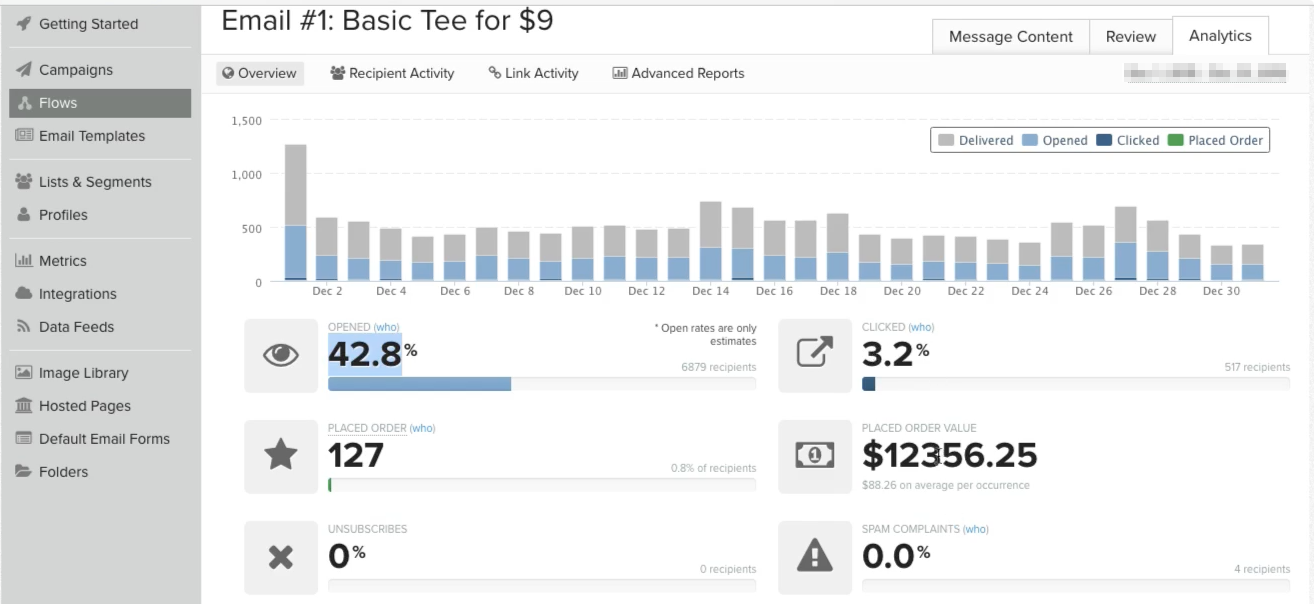
The results from the bounce-back email
Yes, the open rate is actually off the charts and so is the purchase rate. The click-through rate is low, but the placed order value is unbeatable.
So what’s exactly a bounce-back campaign?
It’s an automated email campaign where you send a deadline-bound discount to a buyer who just made a purchase from your store.
Note that it’s a specific offer, along with a discount and a definitive deadline of short duration.
Take a look at the email that Drew set up for Karmaloop:
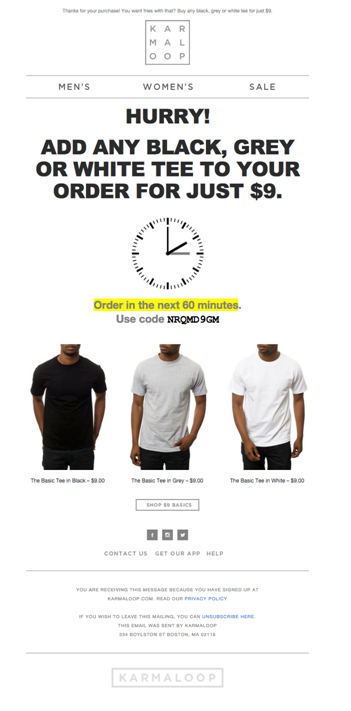
Karmaloop’s exact email with the coupon code
The reason why they chose t-shirts is that they are their high-margin, low-priced, best-selling products.
They have an 80% margin on a $12 t-shirt and generating profits is an important goal of the bounce-back campaign.
Drew mentions that impulse buy products make the best offers and suggest you create offers around items priced at 30% of your store-wide AOV.
That’s kind of the sweet spot. These are your fries.
The #1 Reason Why Bounce Back Campaign Is So Slick
The most important reason why the Karmaloops’ email got such an astounding open rate and purchase rate is recency.
There’s momentum, people are excited about the purchase– neurologically too because the ‘feel good’ chemical dopamine just got released in their brain.
Also, they’re actively thinking about the goal they want to achieve with the purchase.
In this case, it could either be adding more stuff to their shrinking wardrobe or having something suitable to wear for an upcoming outing with friends.

When someone makes a purchase, feel-good chemical ‘dopamine’ gets released in their brain.
Drew says recency predicts how likely a customer is to respond to your offer. Therefore, the sooner you place the offer on the table, the more effective it’ll be!
Relevant Offer + Well-timed Pitch (Immediately after they place order) + Definite Deadline = Boost in Repeat Sales ($$)
How To Set Up The Bounce-Back Campaign In WooCommerce?
Heads up: We’ll use WooCommerce order emails & NextMove Thank you page plugin.
Here’s how we’ll do it:
Unveil the coupon code + deadline on the thank you page and then take the conversation forward via the order email.
Order emails have an open rate as high as 40-50% None of your promotional emails can beat that.
So we’ll append the coupon code element right there to remind them they have an incentive to buy again.
So let’s look at how you can make your customers bounce back immediately after their last purchase.
Step #1: Create a new thank you page with NextMove and set up a rule
You can set up this thank you page to show up when certain select items are purchased or on all purchases.
Here’s how you can set up the rule:

Step #2: Create a new coupon code in native WooCommerce
The preliminary step to this one is creating a coupon code. Take a look at how you can create a simple 15% off coupon code:
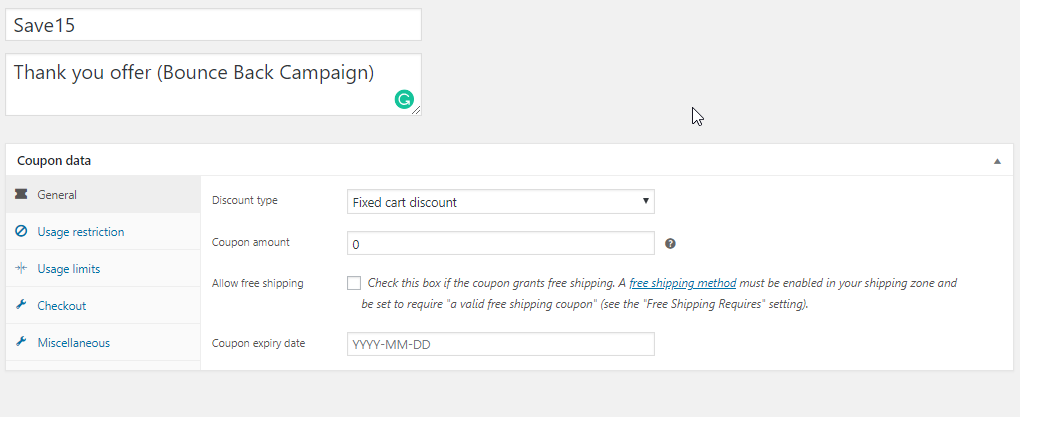
You may set up this coupon code such that it can only be applied when select products are being purchased.
You may go to advanced settings and further set up usage restrictions, in this case, we’re restricting it to the clothing category:
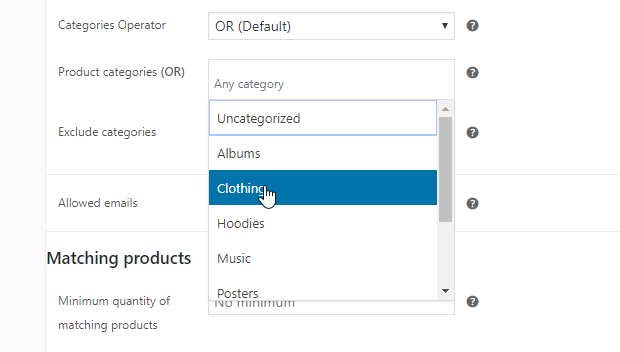
Coupon >> Advanced Settings. Choose to make this code applicable to all products/select category/select item(s)
Step #3: Personalize the Thank You coupon code & add a deadline to it in NextMove
Go To NextMove >> Components >> Dynamic Coupon. Here is the setting you’ll see:
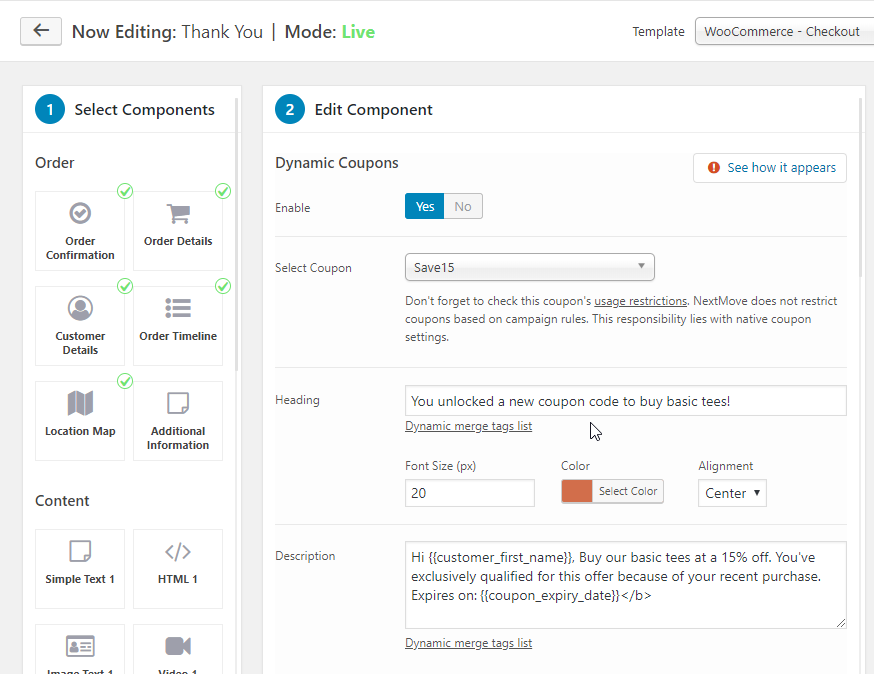
Personalized Coupon Code That Shows Up On Thank You Page
Select the right coupon code from the drop down and write the heading + description for the coupon code box.
Step #4: Choose specific products to give them ideas for next purchase (Optional)
In the ‘specific product’ component choose the specific products that you’d like to display on the thank you page. These are the $9 tees that Drew shows in his campaign.
The idea is to offer them a coupon code to buy specific items, instead of having them spend time zeroing in on the right products.
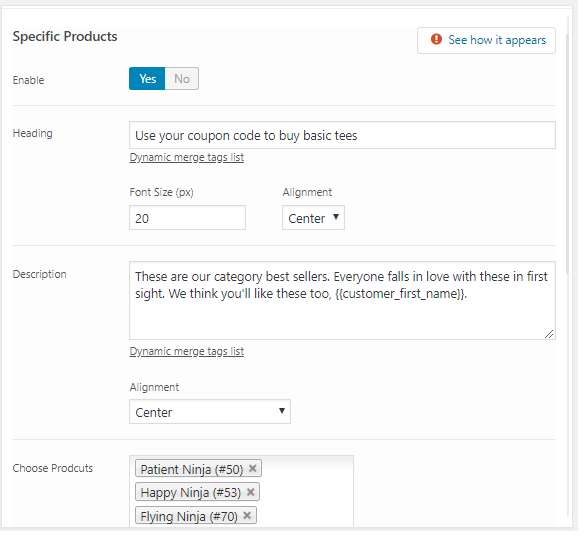
Choose specific products to show on thank you page (users can use the coupon code to buy these)
There you go! Your Thank You page with the coupon code is now ready:
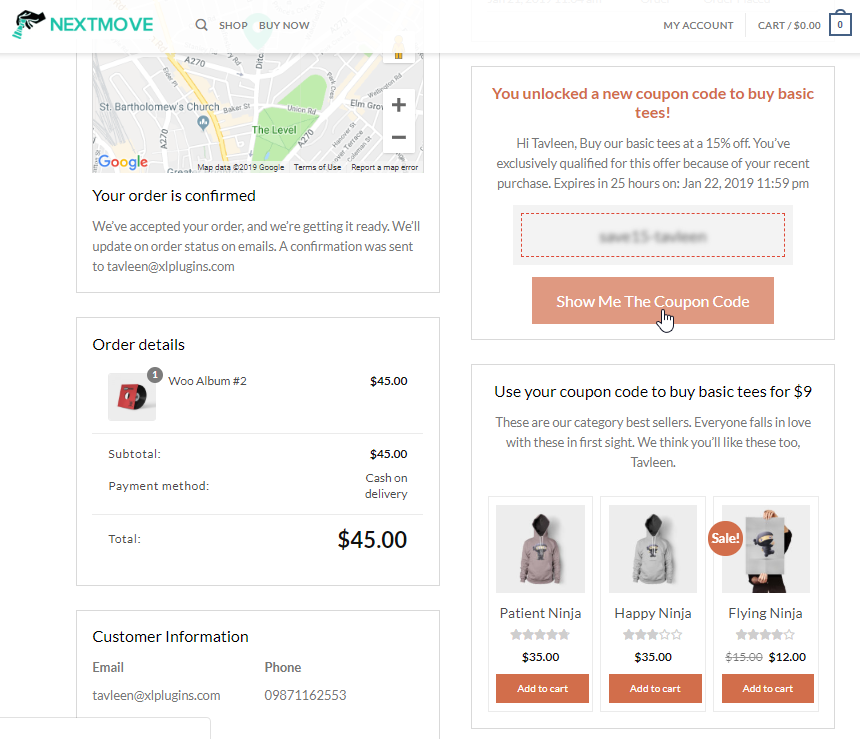
Thank You page with a coupon code to make the next purchase
When they click to unveil the coupon code, here’s what they’ll see:
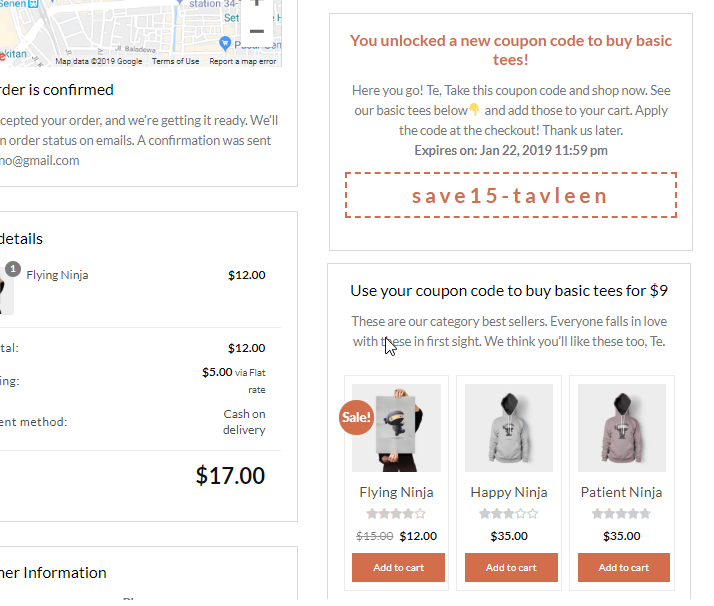
The personalized thank-you coupon code on the thank you page
This is completely optional if you want you can also reveal the coupon code right away on the thank you page, without the extra click.
Step #5: Append this coupon code box in your WooCommerce order emails
Finally, you can embed it in your WooCommerce order email. You should have NextMove power pack installed when you’ll click on the button, you’ll see the option to embed the code:
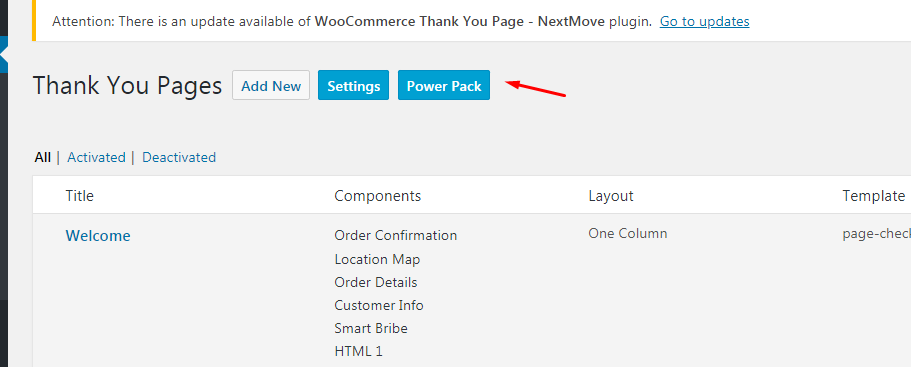
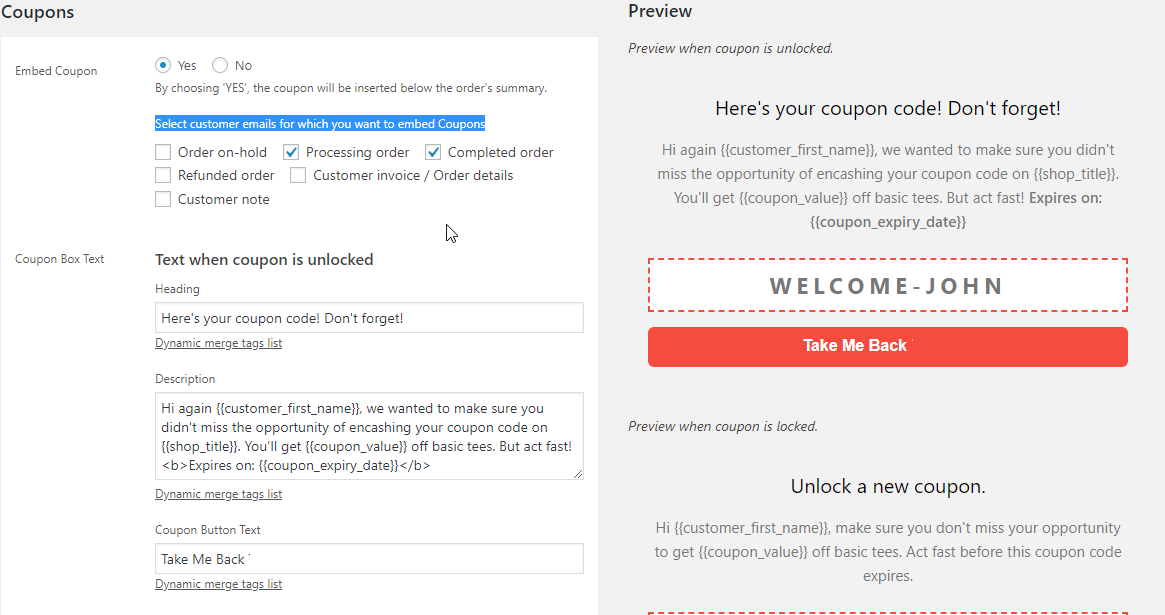
You simply have to select “Yes” to embed the coupon code and configure rest of the settings:
Here’s how it’ll appear in the order email:
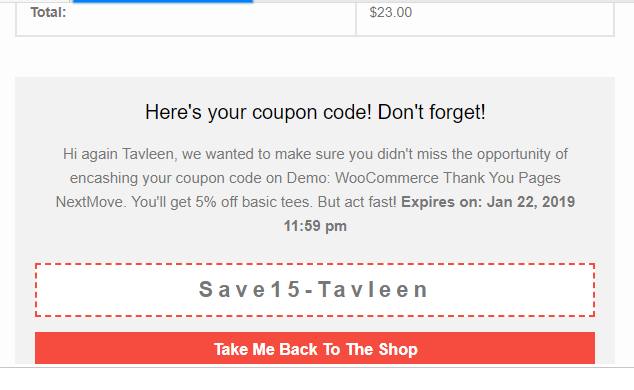
WooCommerce Order Email With Coupon Code & a Link Back To The Shop
Use the CTA button to direct them to the specific category where the coupon code is applicable for availing the discount or the shop page.
Implement This Nifty Tactic Today, Here’s Why
The open rate for marketing emails are not more than 15% but the open rates of order emails are a high 30-40%.
Since your customers have just placed the order, they’re listening in ardently. And as Drew highlighted, the recency of the last purchase has a huge influence on the engagement rate and repeat sales.
So while you can crack your brains over what subject line to use in your promotional emails, transactional emails will win effortlessly.
And the best part with revealing the coupon code on the thank you page is that you can start the conversation right away & follow up with it in the order email.
Never forget- the business is always in the follow-ups. Therefore having the ability to send the ‘thank-you’ coupon code in the order emails can be a boon for your business if used well.
Implement this today so that you can mint more cash for the rest of 2019.
Explore more about NextMove Thank You Page >>
Also, if you’re looking to make more dollars per every transaction on your store, learn about UpStroke – One-click upsell plugin for WooCommerce here.
